Teaching Diffusion Models Specific Concepts
By Ignacio Aristimuño
1. Introduction
1.1 Motivation
Have you ever found yourself tirelessly scouring the internet for that one image that perfectly conveys your creative vision, only to come up short? Perhaps you’re a content creator on the quest for visuals that align seamlessly with your ideas. But hours of web surfing yield little more than frustration. Imagine a scenario where the image you envision doesn’t exist or creating it from scratch seems like a heavily time consuming task. Enter diffusion models and their diverse range of variations as your creative allies. These models empower you to craft stunning compositions that can capture the essence of your vision. The best part? Achieving this doesn’t require navigating complex processes. With just a few simple text prompts and an intuitive user-friendly interface can bring your ideal image to life. As an example, look at the following image:
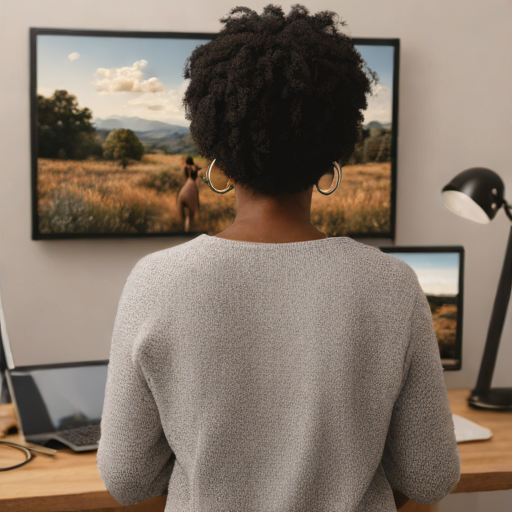
A picture of a person scouring images from the internet, created using Stable Diffusion XL turbo [1] with the prompt “realistic picture of a content creator, seen from behind, looking for landscape images at their screen”
1.2 Introduction to Stable Diffusion
Stable Diffusion (SD) was trained on LAION-5B. LAION is dataset of 5.85 billion CLIP-filtered image-text pairs from a wide variety of visual phenomena. From these, 2.3B are written in English, 2.2B samples are written on a wide range of 100+ other languages. There is also 1B samples have texts which do not allow a certain language assignment (e.g. famous people names). This allows the model to grasp diverse visual concepts using various languages and remember landmarks and people. Diffusion models excel at generating images for various purposes. Hence the importance of understanding alternatives like fine-tuning for enhancing performance on specific concepts.
In our previous blog [2], we explored the fundamentals of diffusion models, their inner workings, and the incredible possibilities they offer. We also introduced Stable Diffusion, renowned for its Classifier-Free Guidance capabilities. But more importantly, the enhanced efficiency, accelerated training and inference speed-up thanks to its latent space approach. Now, it’s time to dive deeper into the realm of diffusion models. Our goal is to discover how we can leverage these remarkable models to teach them specific concepts via fine-tuning, all while retaining control over the generated output to perfectly align with our unique vision.
2. Methods
When it comes to teaching diffusion models to grasp a specific concept, such as an object or a particular style, there are four main methods at our disposal:
- DreamBooth
- Textual Inversion
- Low-Rank Adaptation (LoRA)
- HyperNetworks
There are some more alternatives such as Aesthetic Embeddings. Nevertheless, in this article we’ll focus on these four, as other techniques are still need some improvements to provide images with comparable quality to the other alternatives. Throughout our overview on these methods, we’ll discuss their inner-workings, strengths, and potential tradeoffs.
For the sake of simplicity, let’s consider a use case where our objective is to generate new images of a specific concept purely through prompting, without relying on additional input sources, although these additional inputs will be discussed later on the section of ControlNet [3].
2.1 DreamBooth
2.1.1 How does it work?
DreamBooth, as proposed in “DreamBooth: Fine Tuning Text-to-Image Diffusion Models for Subject-Driven Generation” [4], Ruiz et. al (2023), works by altering the parameters of the diffusion model itself (via fine-tuning) until it understands the new concept.
To teach diffusion models a new concept, like generating images of your own cat, gather reference images for this concept and prompt using a unique identifier—unseen during training, known as the SKS token. The SKS token helps the model associate this new token with the visual concept each time it appears in the prompt.
Regarding the text embedding in the SD model, DreamBooth doesn’t alter the encoding for the new token but associates this embedding with the new concept in the images.
2.1.2 Interaction of main components
For the sake of simplicity let’s consider a fine-tuning consisting of just one image, although the authors refer to using from 3 to 5 images within a few batches.
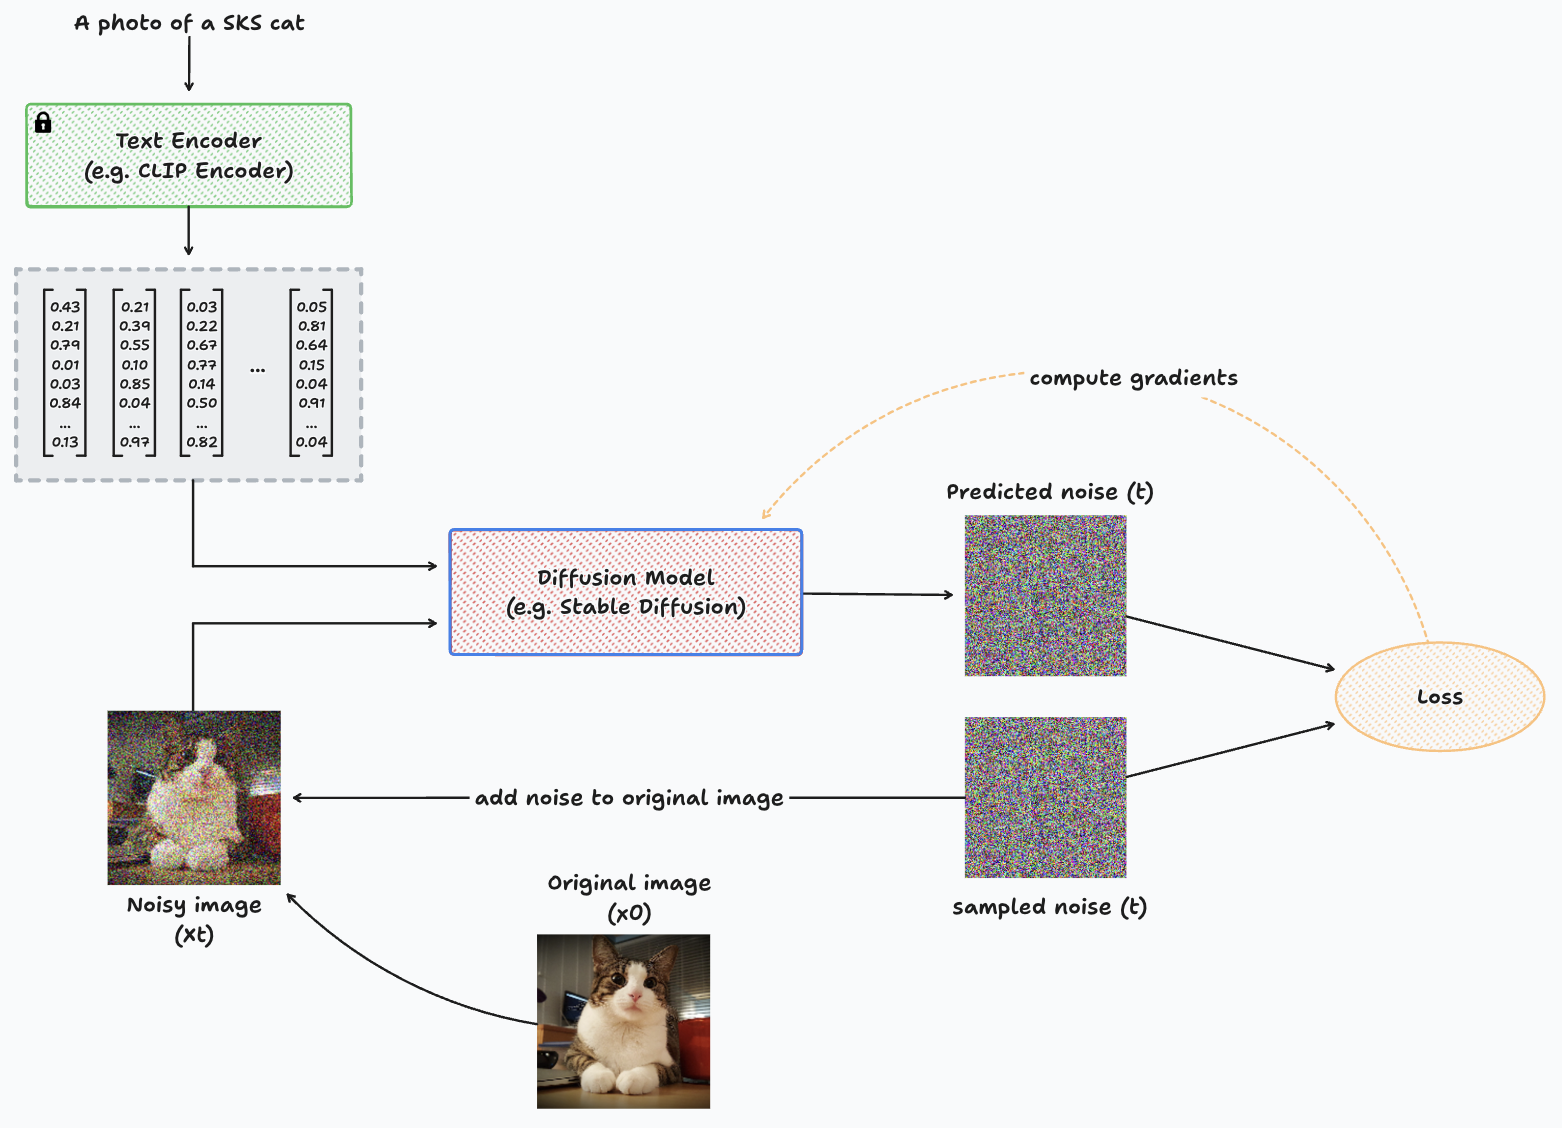
Diagram representing the training process with DreamBooth for a single image.
We take an image which contains the new concept (x0), then apply t steps of noise to create a noisy input image for the model (xt), and pass this noisy image through the diffusion model to predict the noise present in the image. The comparison between the noise prediction and the actual noise added to the original image is used to compute the loss function, calculate gradients, and then update the parameters of the diffusion model.
The input to the diffusion model consists of the noisy image, the sampled timestep t and the prompt which represents the new concept, such as: “A picture of a SKS cat”.
The SKS textual embedding may not refer to an already known concept. Therefore, the diffusion model would probably do a pretty bad job at denoising the image the first few times. However, this will eventually lead to a model that understands the concept we are trying to teach by using both images of the concept and the SKS token within the text prompt.
Note: one important difference between fine-tuning a U-Net from a Stable Diffusion model, is that the noising and denoising process in SD is being held in the latent space, hence the image is not corrupted as shown in the previous diagram. If you want to read more about this latent space approach, you may take a look at our previous blog [2].
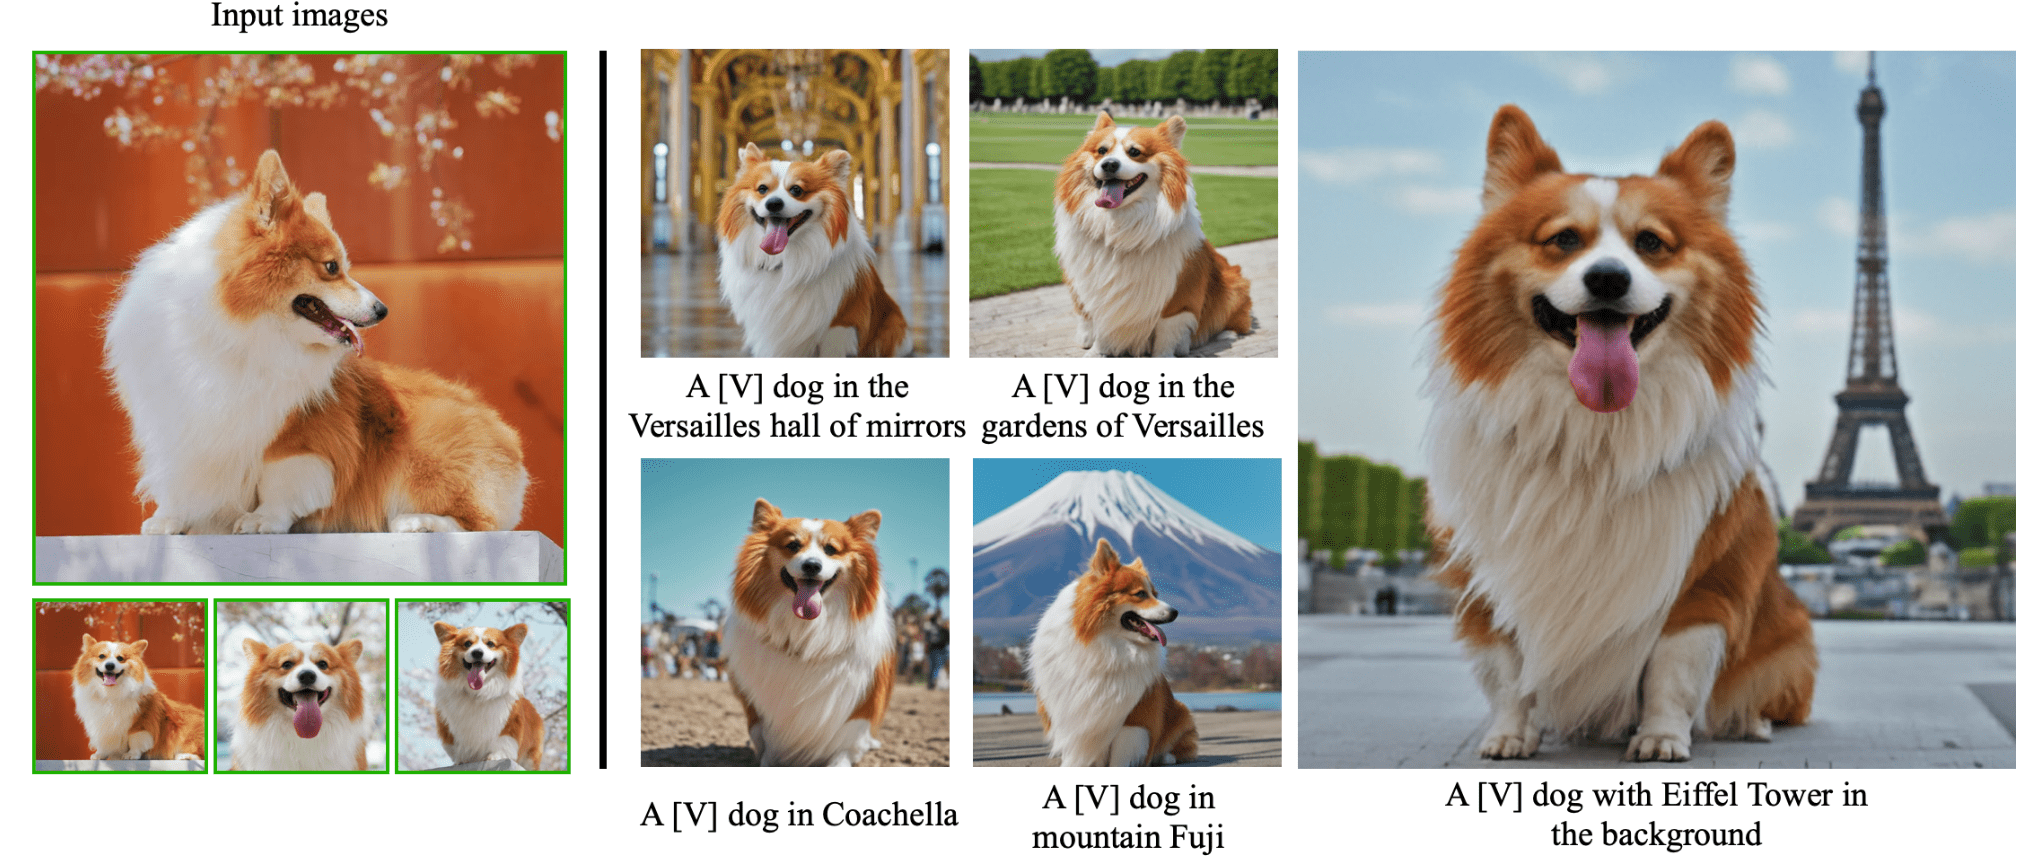
An example of the input images and inferences of a taught concept (a specific Corgi) within diverse contexts, as presented in DreamBooth’s official webpage [5].
2.1.3 Main takeaways
This is likely the most effective way to teach a new concept, tailoring the entire network to your specific use case. However, it comes at a cost – the network may become less proficient at general image generation. Also, it may not be suitable for teaching multiple concepts simultaneously, as it often results in unsatisfactory outcomes.
Fine-tuning different diffusion models for each concept is an option. However, it requires more disk memory and computational resources, including GPU and RAM.
2.2 Textual Inversion
2.2.1 How does it work?
Textual Inversion is a technique proposed in “An Image is Worth One Word: Personalizing Text-to-Image Generation using Textual Inversion” [6] by Gal et. al (2022).
The setup for Textual Inversion is basically identical to DreamBooth’s but with some tweaks. Instead of updating the model’s gradients as a penalty when there is an incorrect prediction of the noise added to the input image, it updates the SKS embedding vector. Meanwhile, the diffusion model remains frozen and unchanged. The purpose behind this is to create the right embedding for the SKS token that achieves to identify the visual phenomena (concept) we are trying to teach the model, instead of updating the model itself to generate images of a certain concept with a fixed embedding of a token that has no meaning at all.
2.2.2 Interaction of main components
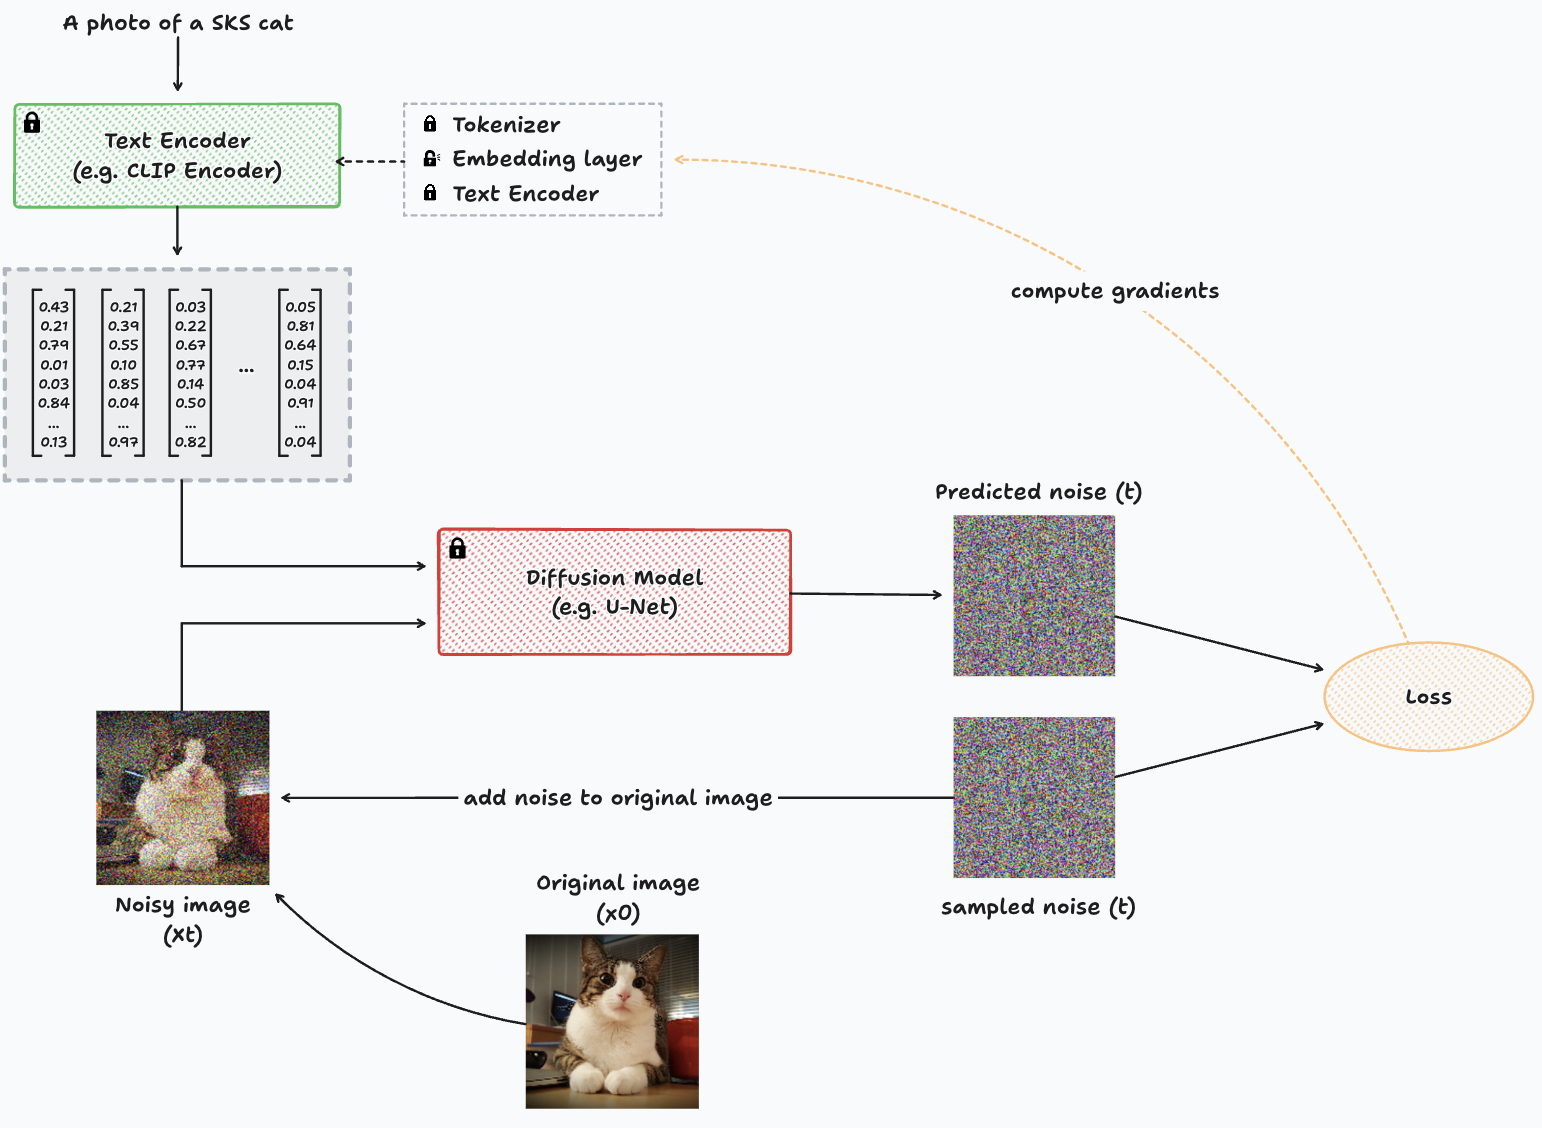
Diagram representing the training process with Textual Inversion for a single image.
In this diagram, we essentially observe the same structure as in DreamBooth. However, a key distinction lies in the fact that the diffusion model is frozen (non-trainable, indicated by the lock icon), and the computation of gradients directs towards the text encoder.
The text encoder depicted in the diagram is a simplified representation of the underlying process. Text encoding involves two main components: the tokenizer and the text encoder itself. The tokenizer serves as a dictionary responsible for mapping each known token to a numerical identifier. This mapping is crucial as Deep Learning models learn exclusively from numerical representations of data.
2.2.3 The text encoder
The former converts each word identifier given by the tokenizer to an embedding which vaguely represents each word in a certain lower dimensional space. While the latter takes this set of vague embeddings generated by the embedding layer and passes them through a transformer text encoder. Being the final output a vector representation of the whole text prompt given as input.
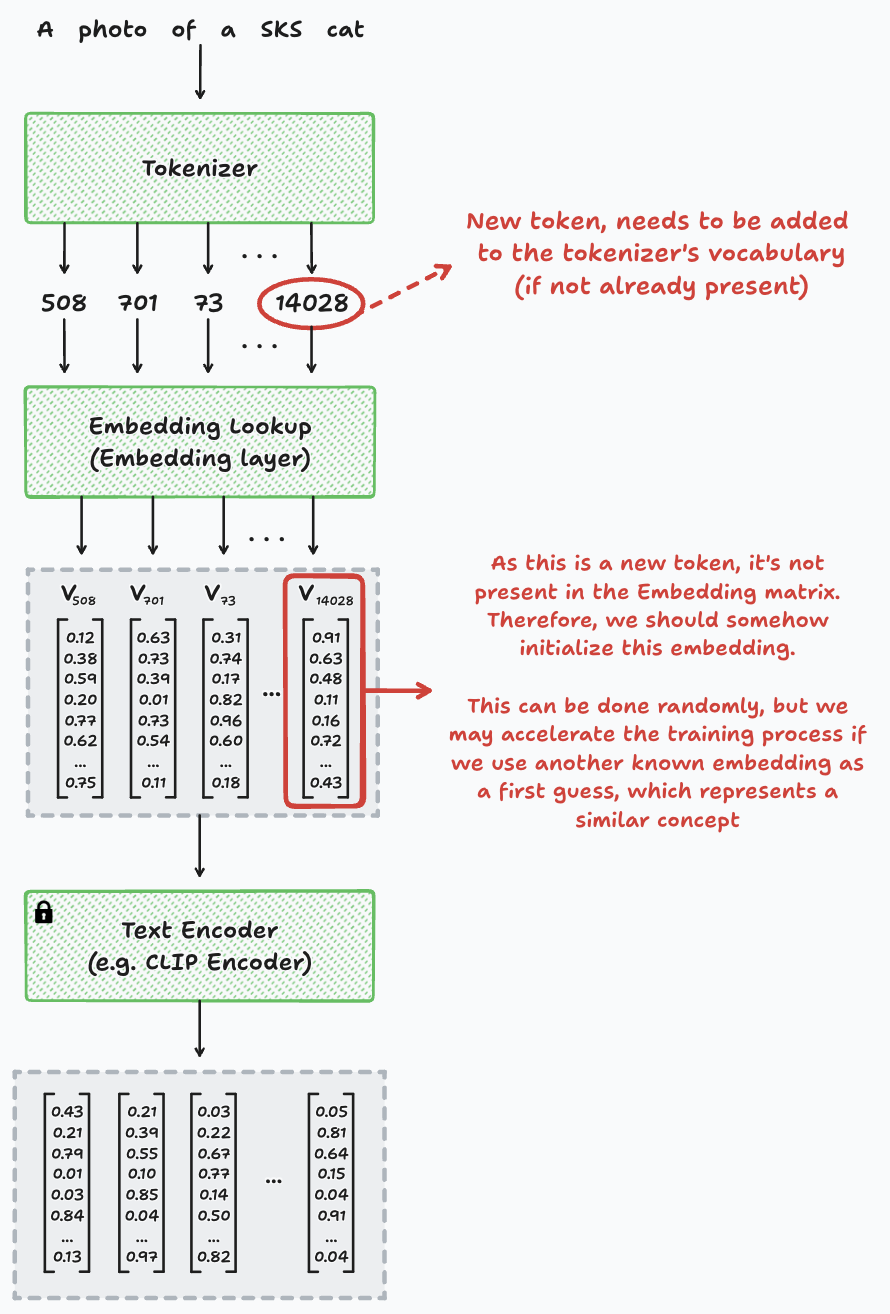
Diagram representing the components of the Text Encoder within the training of Textual Inversion for a single image.
To achieve this, we add the new token to the tokenizer’s vocabulary and initialize its embedding in the embedding layer. This initialization can be random. Although a smarter approach involves initializing the new concept with a word representing something similar, though not identical. Think of it like trying to understand how a Corgi looks like, starting of from the concept of how a dog looks like.
It may seem counterintuitive that we can teach the model a concept by finding the right textual embedding, with no fine-tuning of the model itself. However, in practice, it works well. SD models possess a nuanced understanding of visual phenomena. This allows that using the perfect embedding enables creating arbitrary visual phenomena that still makes sense to humans. The authors state that “the embedding space is expressive enough to capture basic image semantics”. Another way of interpreting this is that we could represent any concept just by typing the correct prompt. Although there are some concepts that are extremely difficult to put into words, hence the need of an automated way to learn this embedding representation.
2.2.4 Main takeaways
One of the greatest benefits of textual inversion is that the artifact we save is smaller than DreamBooth’s. With DreamBooth we need to save the whole new fine-tuned model. On the other hand, with Textual Inversion we can just save the embedding of the SKS token instead. This can also escalate to several new concepts, as these should be different text embeddings that are being used by the exactly same model.
2.3 Low-Rank Adaptation (LoRA)
2.3.1 How does it work?
The Low-Rank Adaptation (LoRA) approach came up initially for Large Language Models (LLMs) in the paper “LoRA: Low-Rank Adaptation of Large Language Models” [7], Hu et. al (2021). This proposal aims to tackle challenges similar to those faced with DreamBooth, where instructing the model on multiple specific concepts required numerous model replicas, demonstrating inefficiency and impracticality.
For the Diffusion model we commonly use a model that inputs and outputs the images of the same size. This is one of the reasons of the popularity of the U-Net for these models. The idea behind LoRA is to insert new tiny trainable layers, called LoRA layers, into the model in such a way that these won’t impact the model parameters at all, while keeping the original model frozen.
At first, these LoRA layers will generate an output identical to their input, replicating the same behaviour of the frozen Diffusion model. However, gradients’ computation will eventually modify these, adjusting their parameters. This process alters the input to intermediate layers within the frozen Diffusion model, guiding the generation towards the desired new concept.
2.3.2 Interaction of main components
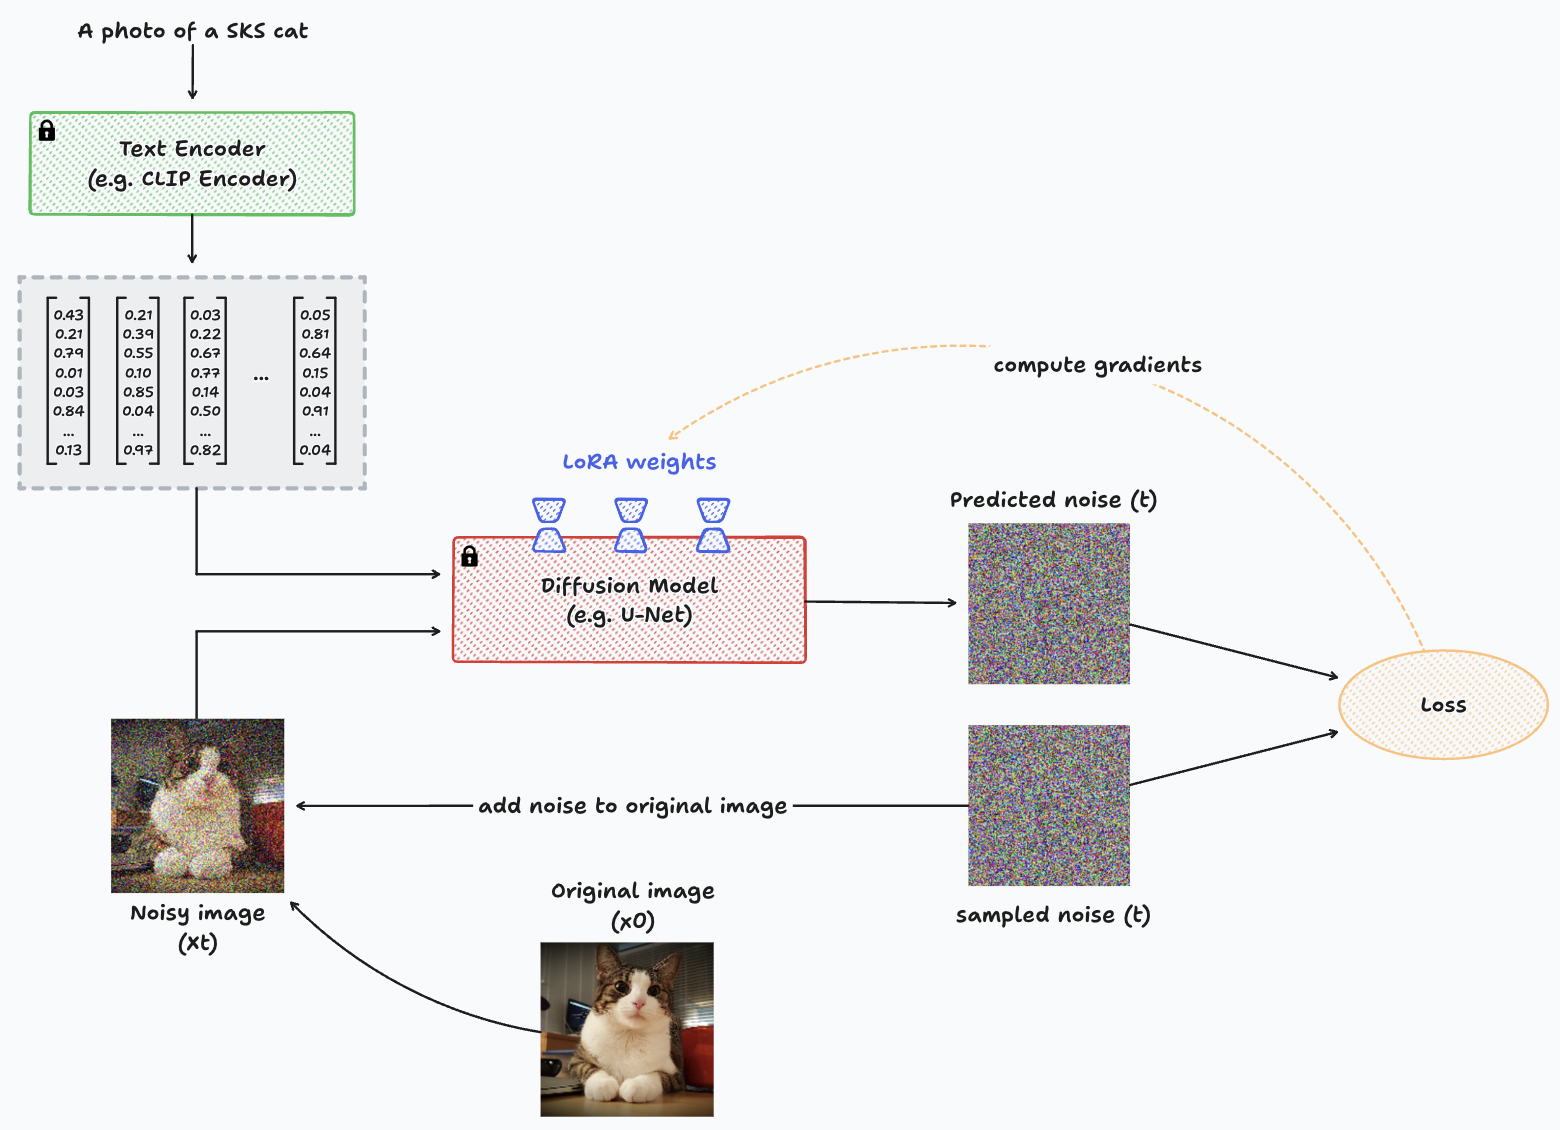
Diagram representing the training process with LoRA for a single image.
As it can be seen in the previous diagram, the Diffusion model is frozen, remaining non-trainable during the whole process. The LoRA weights are the ones subject to updates through gradient computation.
But how do LoRA layers work? We usually incorporate these layers in the attention blocks of the U-Net. These layers take the same input, perform an additional matrix multiplication, and add the result to the previously trained attention output.
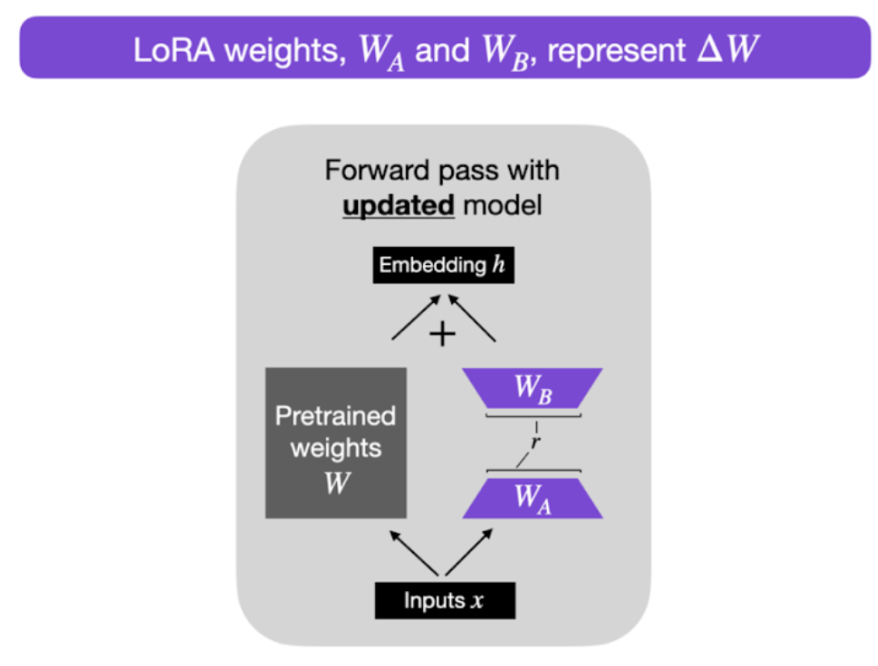
A diagram illustrating the arrangement of LoRA layers within the attention blocks of the U-Net.
Another question is, why do we need these new layers and not just updating the frozen attention weights? One of the main benefits of LoRA layers is the reduced amount of parameters they use. The “Low-Rank” term refers to this. Instead of having a matrix of dimension m x n, we set a multiplication of two matrices WA and WB of dimensions m x k and k x n respectively. If we count the number of parameters needed with each approach, with the former approach we store 2 million values, while the latter (LoRA) we store 6000 values (WA stores 2000 values and WB stores 4000 values).
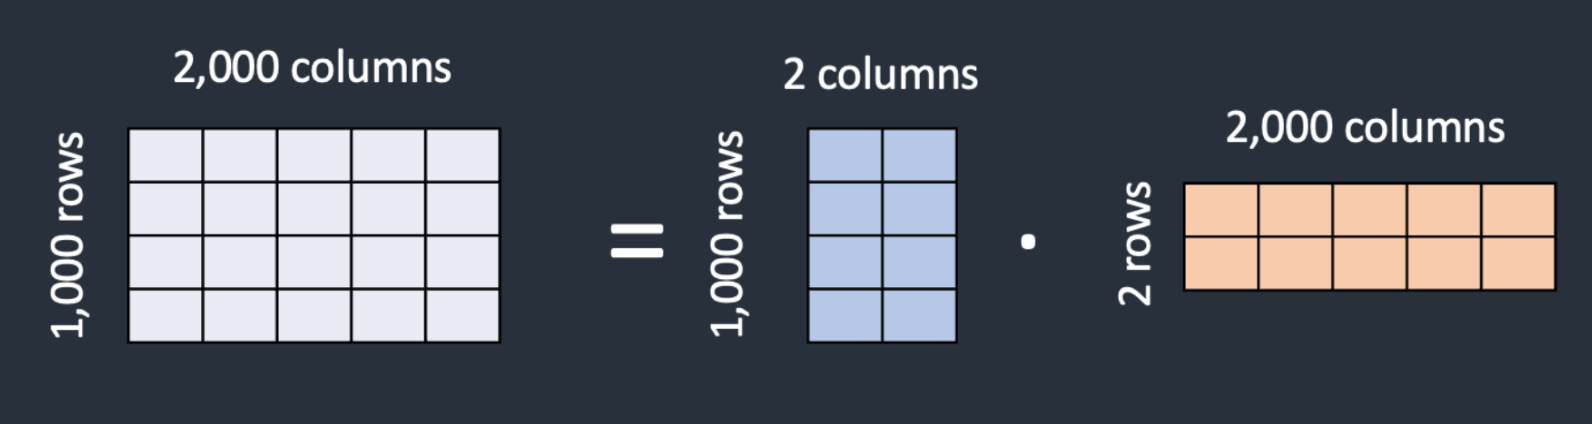
Matrix representation of the matrix decomposition with Low-Rank Adaptation (LoRA).
2.3.3 Main takeaways
LoRA training is a lot faster and takes less memory than fine tuning the whole Stable Diffusion model with DreamBooth. Additionally, LoRA layers are considerably smaller than the SD model itself, making them much easier to store and share compared to the full model.
2.4 Hyper Networks
2.4.1 How does it work?
HyperNetworks work quite similar to LoRA, but instead of adding these intermediate layers into the SD models, we have a separate model – called the HyperNetwork – which is trained to create some matrices which slightly tweak the feature maps’ values inside the Diffusion model, so that it learns to generate the desired concept. There’s no official paper for this type of networks, however, there are several papers that introduce this way of fine-tuning a SD model, where probably one of the most popular is ControlNet, as proposed in “Adding Conditional Control to Text-to-Image Diffusion Models” [3], by Zhang and Agrawala (2023). Despite presenting other groundbreaking features, which will be discussed shortly, ControlNet is still categorized as a HyperNetwork.
2.4.2 Interaction of main components
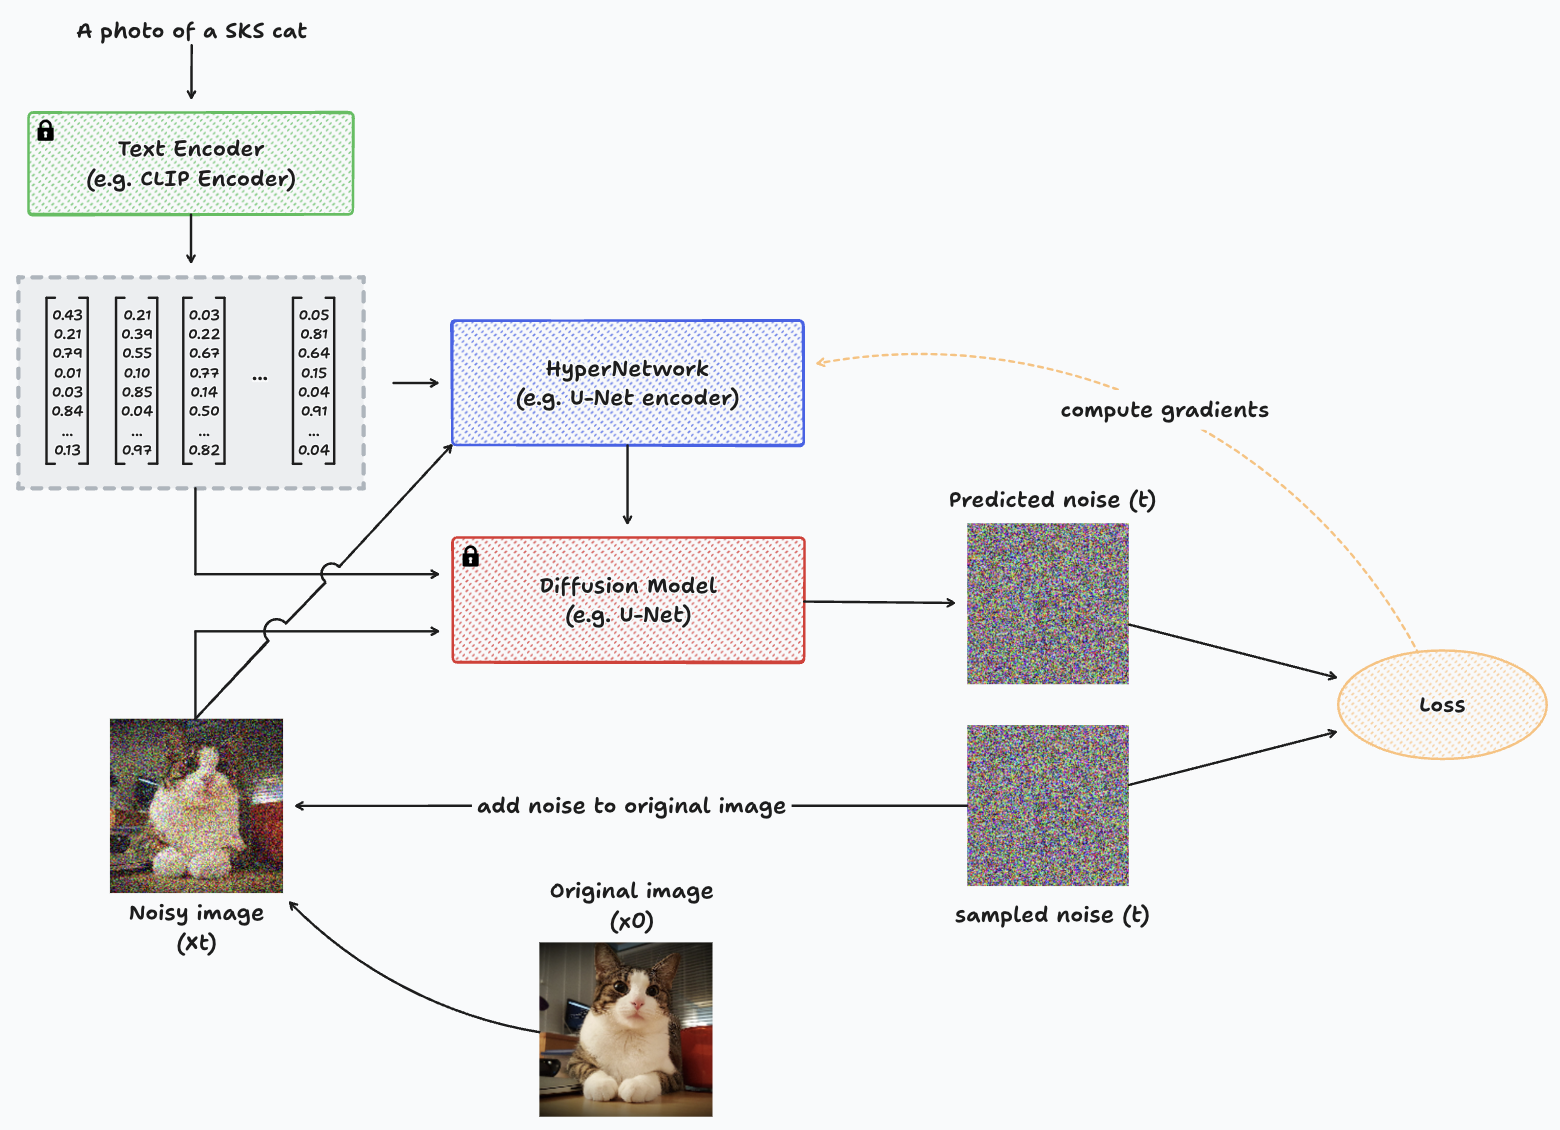
Diagram representing the training process with HyperNetworks for a single image.
To design the HyperNetwork architecture simply, we can simply replicate the encoder blocks of the U-Net, along with its bottleneck. Then, connect these blocks to the decoder blocks of the Diffusion model. In essence, it resembles having two distinct U-Net encoders and a single decoder. One encoder and the decoder have frozen parameters (from the pre-trained Diffusion model), while the new encoder slightly adjusts the input and adds it to the decoder layers to guide generation toward the new concept.
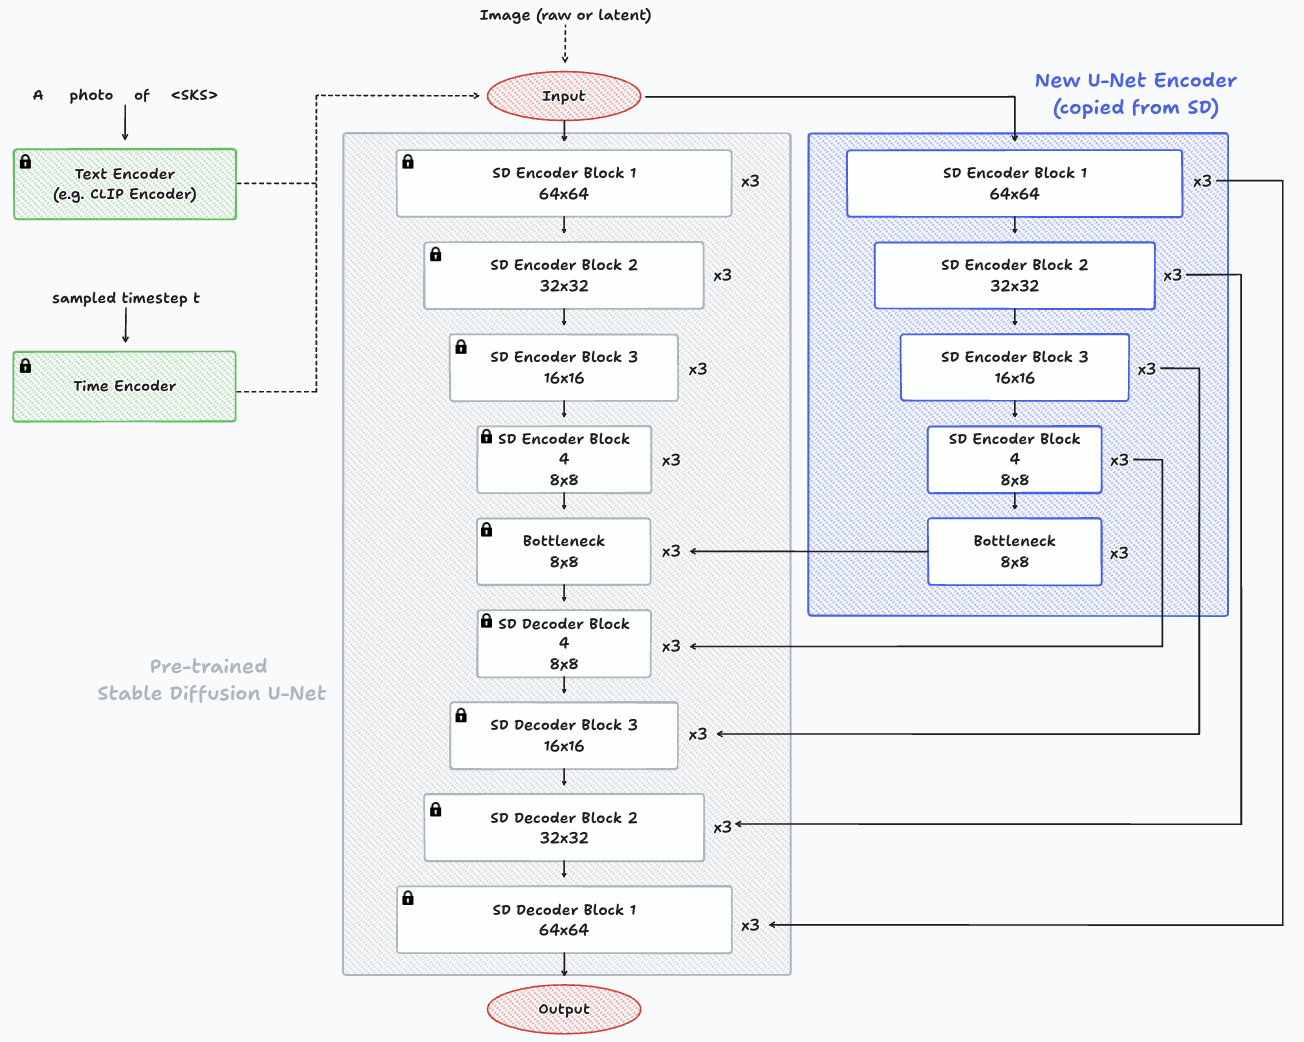
Architecture example of a HyperNetwork and its connection to the Diffusion model. On the center, in grey, we can see the encoder, bottleneck and decoder of the pre-trained Stable Diffusion model with frozen parameters. On the right, highlighted in blue, the new encoder (HyperNetwork) is visible, featuring identical copied layers that connect with the decoder layers of the pre-trained Diffusion model.
2.4.3 Main takeaways
This approach has not yet yielded empirical results comparable to the previously mentioned techniques. However, HyperNetworks gained a lot of attention with the release of ControlNet, an architecture which we’ll be talking about next. These networks have more trainable parameters in comparison with textual inversion and LoRA. This could theoretically mean they could learn more complex patterns, but less than fine tuning the entire Stable Diffusion model as it happens with DreamBooth.
2.5 ControlNet
2.5.1 How does it work?
Although we presented ControlNet [3] as a particular case of HyperNetworks, it is of our interest to present the main advances it entails, as it was proposed as an end-to-end neural network architecture able to control large image diffusion models (like Stable Diffusion) to learn task-specific input conditions.
2.5.2 Interaction of main components
The ControlNet clones the weights of a large diffusion model into a trainable copy and a locked copy. The locked copy maintains the network capability acquired from billions of images during pre-training. Simultaneously, the trainable copy undergoes training on task-specific datasets to acquire conditional control, establishing a direct link with the architecture presented in the HyperNetworks but with a few tweaks.
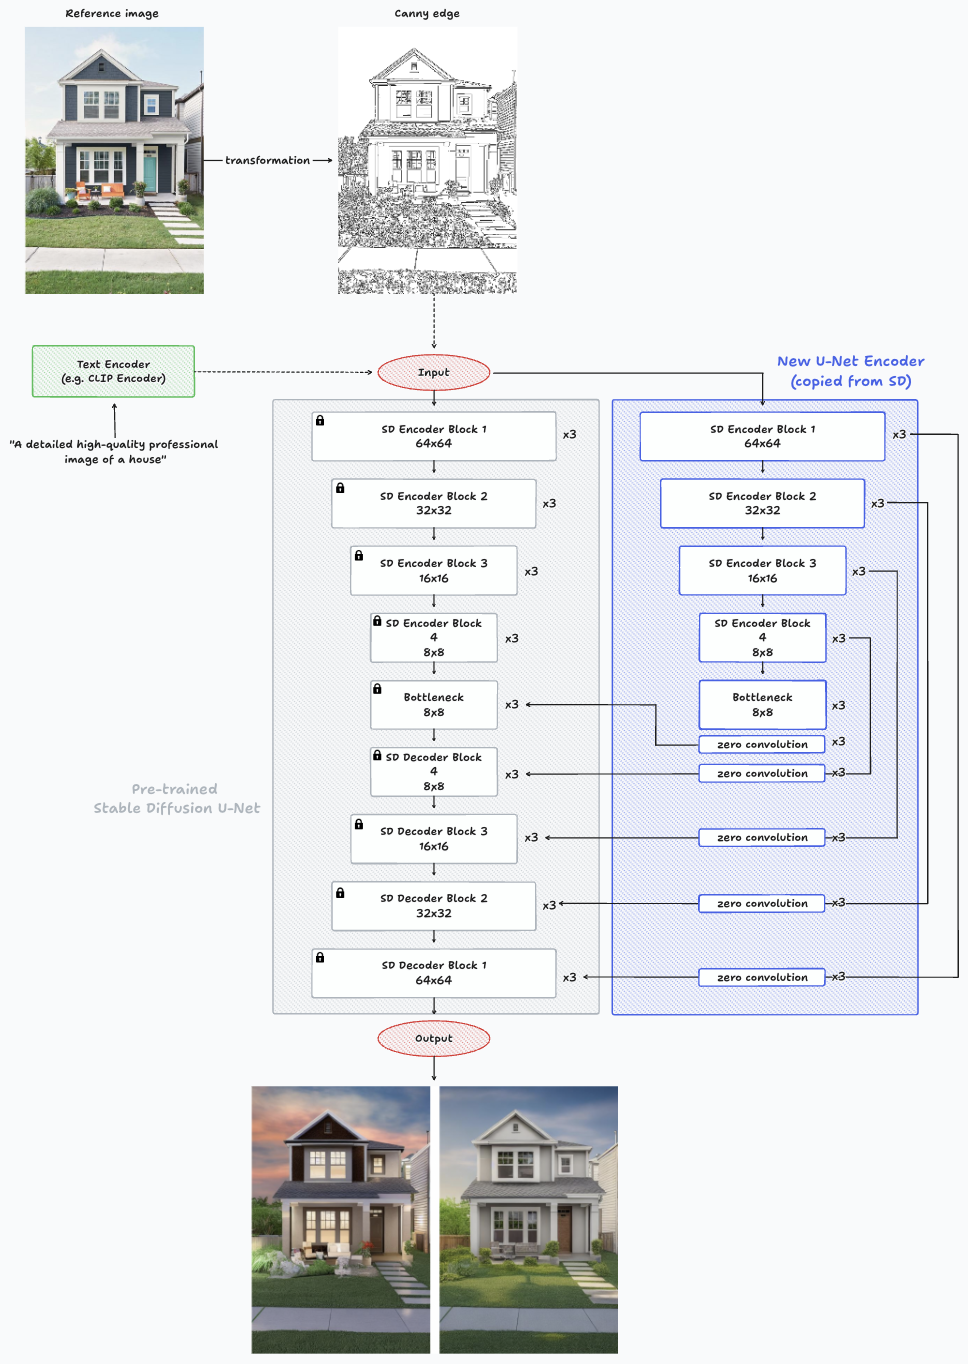
Architecture of ControlNet while making an inference on a single image with Canny Edge.
The most noticeable changes from the architecture shown in HyperNetworks is the addition of zero-convolution layers after the new encoder’s blocks and before entering to the Stable Diffusion decoder, and the ability to guide the image generation with a new input such as the one shown of Canny Edge.
The trainable neural network connects to the locked neural network through a distinctive convolution layer known as “zero convolution”. This layer gradually adjusts its convolution weights, progressing from zeros to optimized parameters in a learned manner. The preservation of production-ready weights enhances training robustness across datasets of different scales.
2.5.3 Conditioning mechanisms
Some of the most common conditionings used in ControlNet are, but not limited to:
- Canny Edge: detection of edges by smoothing the image with Gaussian filters, then removing the noise using a discrete Gaussian kernel, and then identifying the areas in the image with the strongest intensity gradients.
- Depth map: refers to an image or channel that contains information relating to the distance of the surfaces of the objects present in a scene from a certain viewpoint.
- HED: attempts to address the limitations of the Canny edge detector through an end-to-end deep neural network.
- Normal mapping: is a texture mapping technique used for faking the lighting of bumps and dents, enhancing the appearance and details of a low polygon model by generating a normal map from a high polygon model or height map.
- Line segment detection: it’s similar to canny edge but for detecting lines instead of segments.
- Scribbles: used to control the generation with scribbles or sketches.
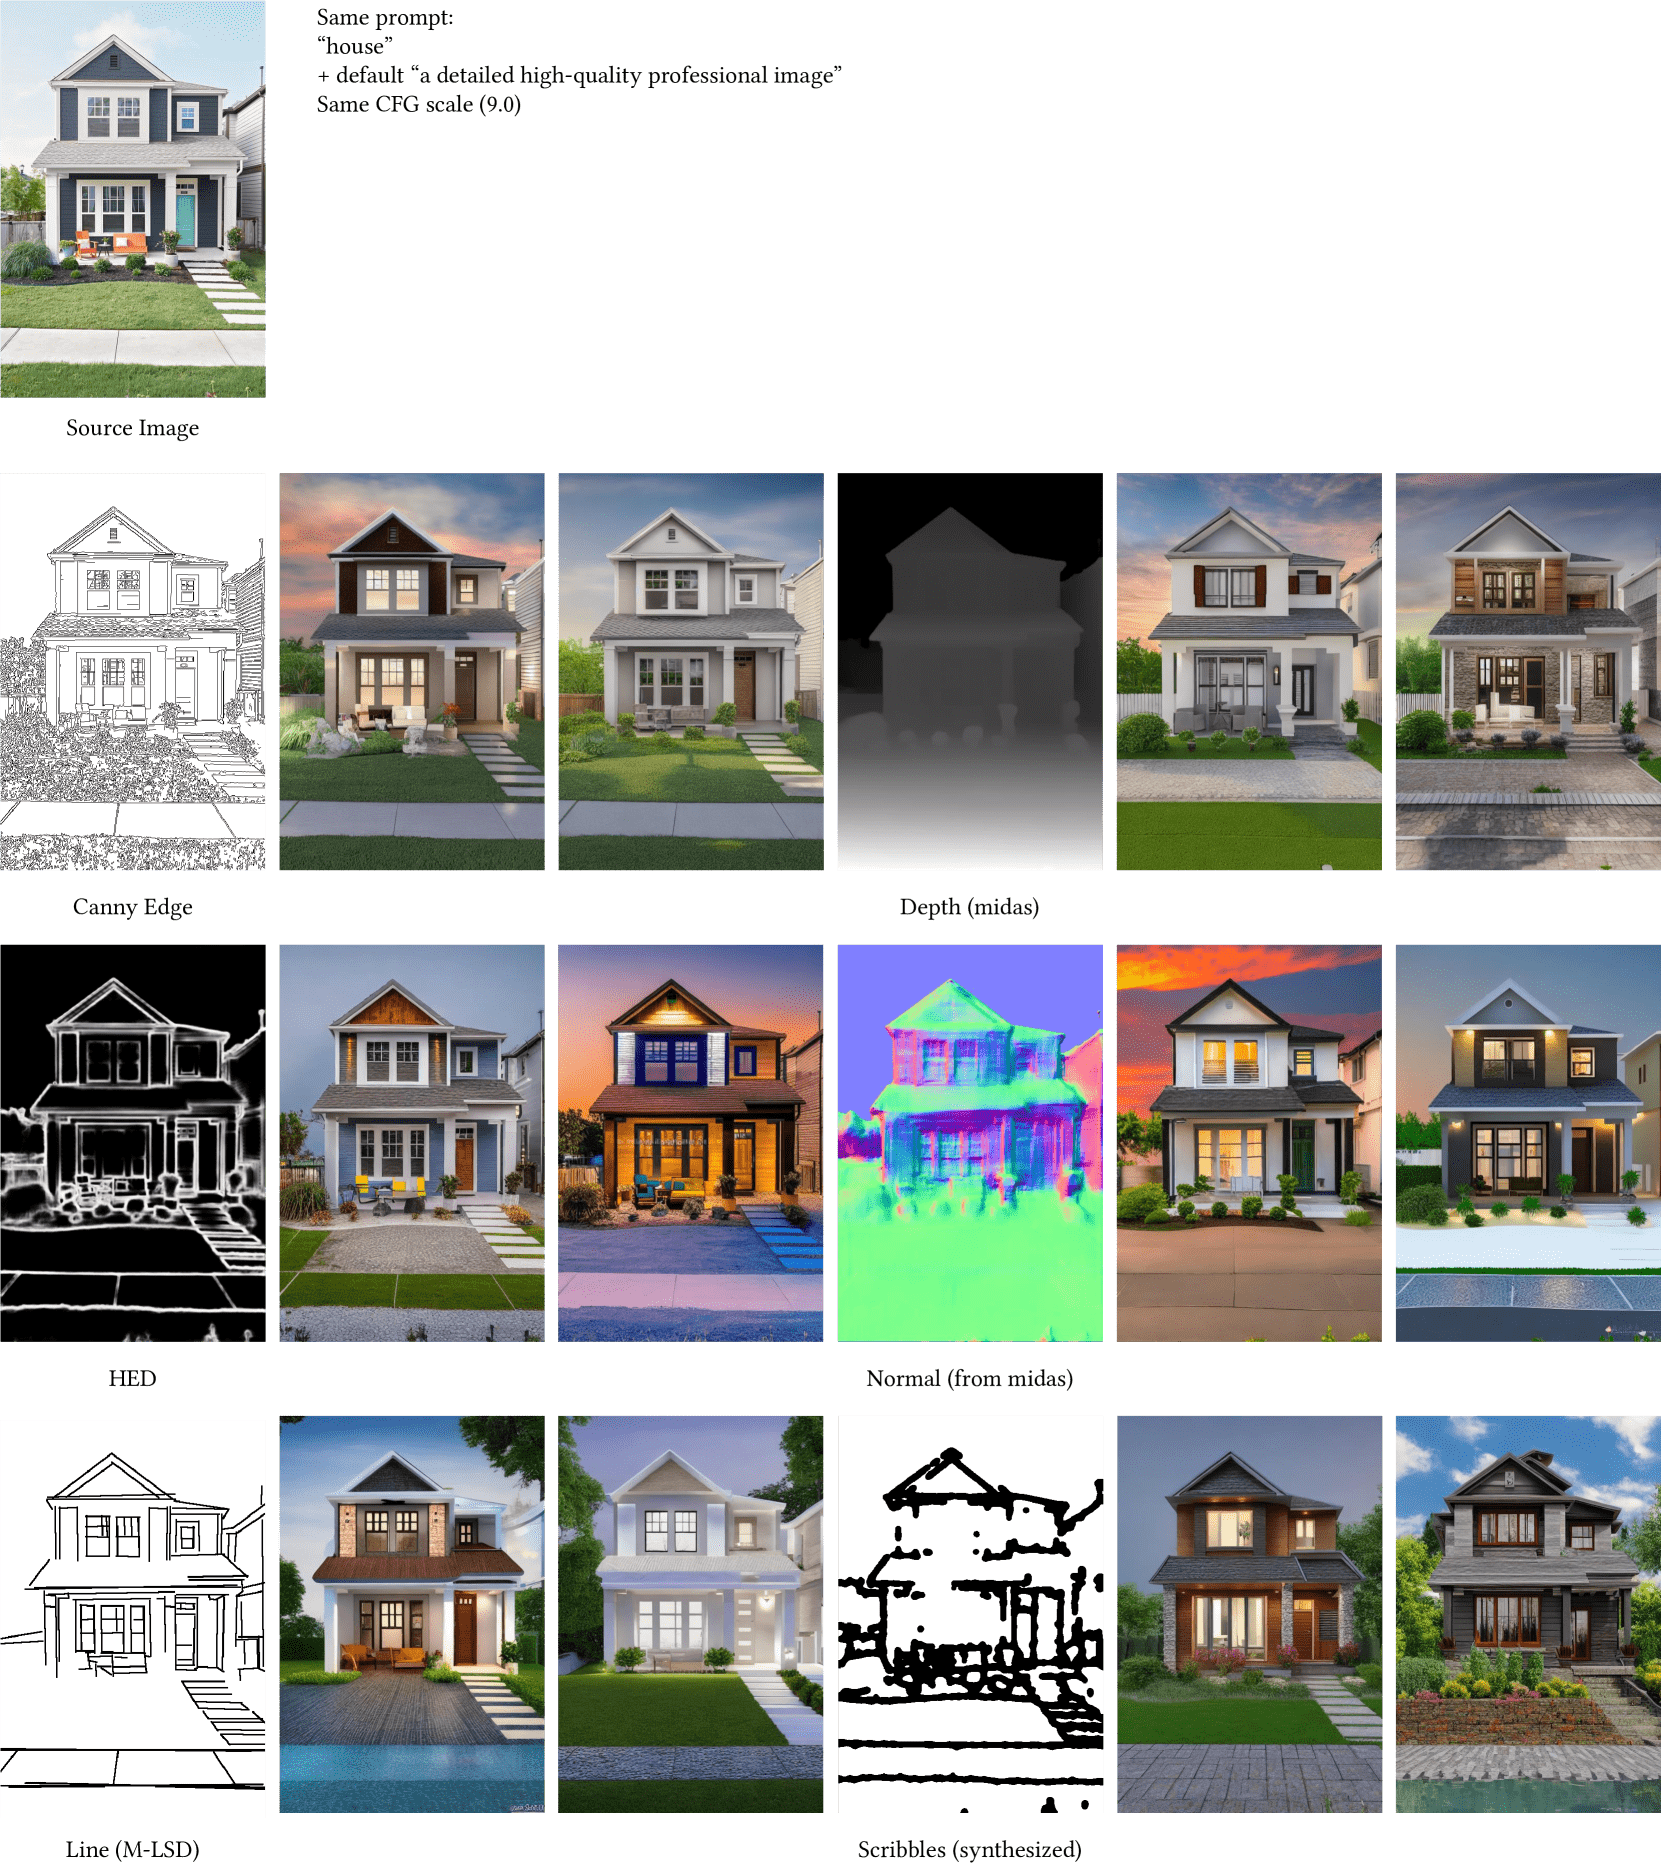
Examples of possible inputs added to guide the generation of images with ControlNet.
2.5.4 Main takeaways
The ControlNet paper authors trained several ControlNets with diverse datasets, including mentioned conditions and others like pose estimation. They experimented with small datasets (less than 50k or even 1k samples) and large datasets (millions of samples). Results indicate that for tasks like depth-to-image, training ControlNets on a personal computer (Nvidia RTX 3090TI) can achieve competitive results compared to commercial models trained on extensive computation clusters with terabytes of GPU memory and thousands of GPU hours.
3. Real-world Use Cases of Diffusion Models
3.1 Virtual Try-On
Virtual Try-On lets users digitally visualize and experience how clothing, accessories, or items look and fit in real-time. It provides an interactive way to explore styles and make informed purchasing decisions without physical fitting rooms.

Example of virtual try-on of clothes on a model
3.2 Creation of Ads
The creation of ads involves crafting persuasive and visually compelling content. This often occurs using a combination of text, images, and multimedia elements. The objective is to effectively communicate a brand’s message, products, or services to a target audience. Diffusion models can help accelerate this process, using less resources and less time, assisting marketing and design teams.
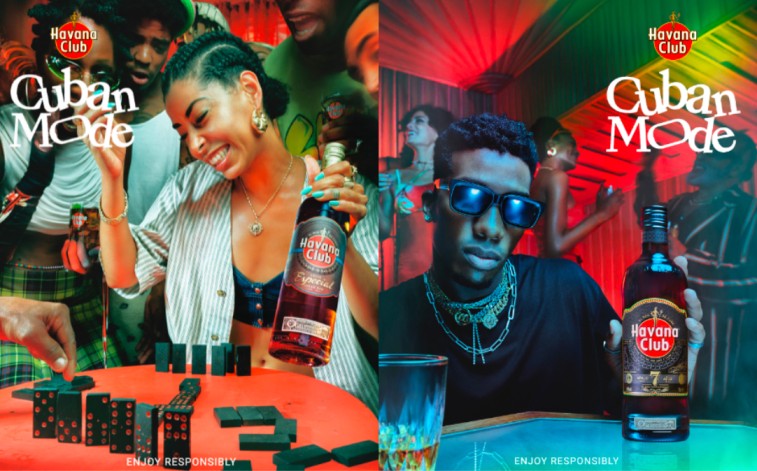
Example of ads created using diffusion models as the base image with some posterior editing
3.3 Design of Products and Clothes
The process of designing products and clothing entails the conceptualization of innovative and functional ideas for their aesthetics and utility. Applying creative thinking to craft unique and practical items, ranging from tech devices to apparel collections. Designers consider color, forms, materials, and seamless component integration for visually appealing and functional creations that resonate with users.
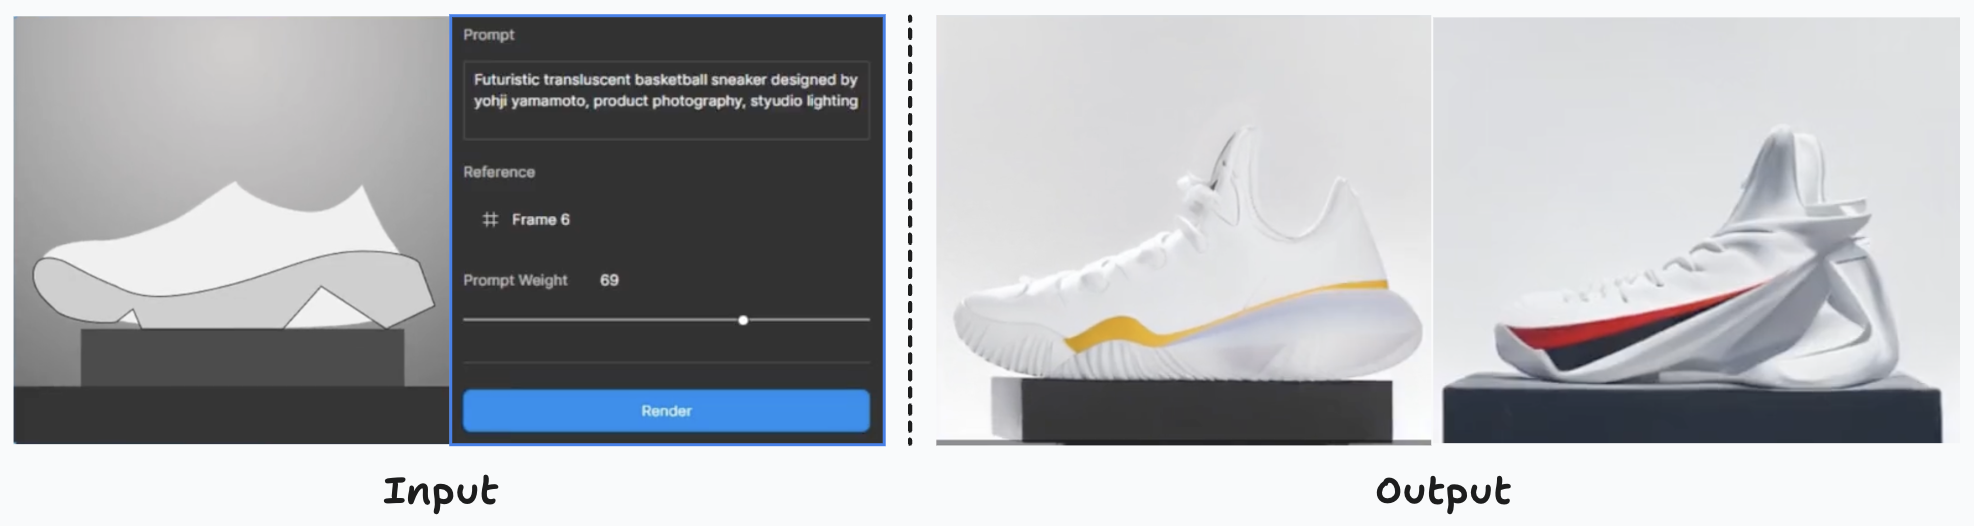
Creation of product variants based on a sketch of the product and modified by using the prompt “Futuristic translucent basketball sneaker designed by yohji yamamoto, product photography, studio light”
3.4 Movie Scenes Enhancements
Enhancing movie scenes involves refining various aspects of cinematic sequences. This includes improving visual effects, optimising audio elements, and overall elevating the audience experience. These enhancements can also lead to cost and time savings during post-production editing. This efficient approach enables filmmakers to allocate resources more effectively while delivering a polished and captivating final product.
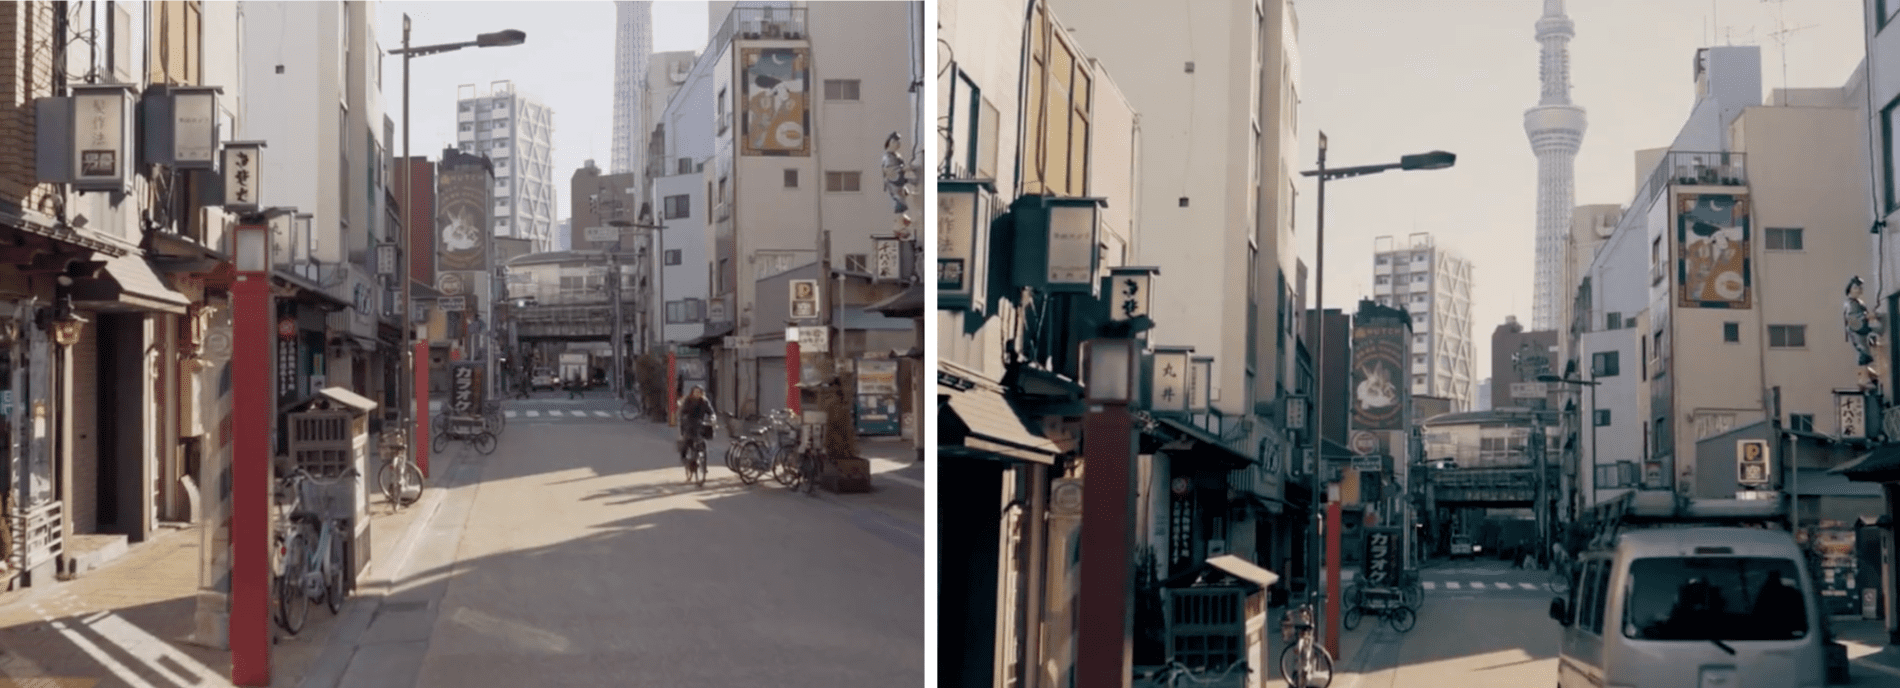
The right image is a frame of the same video of the left image, but modified by using the prompt “Make it look more cinematic”
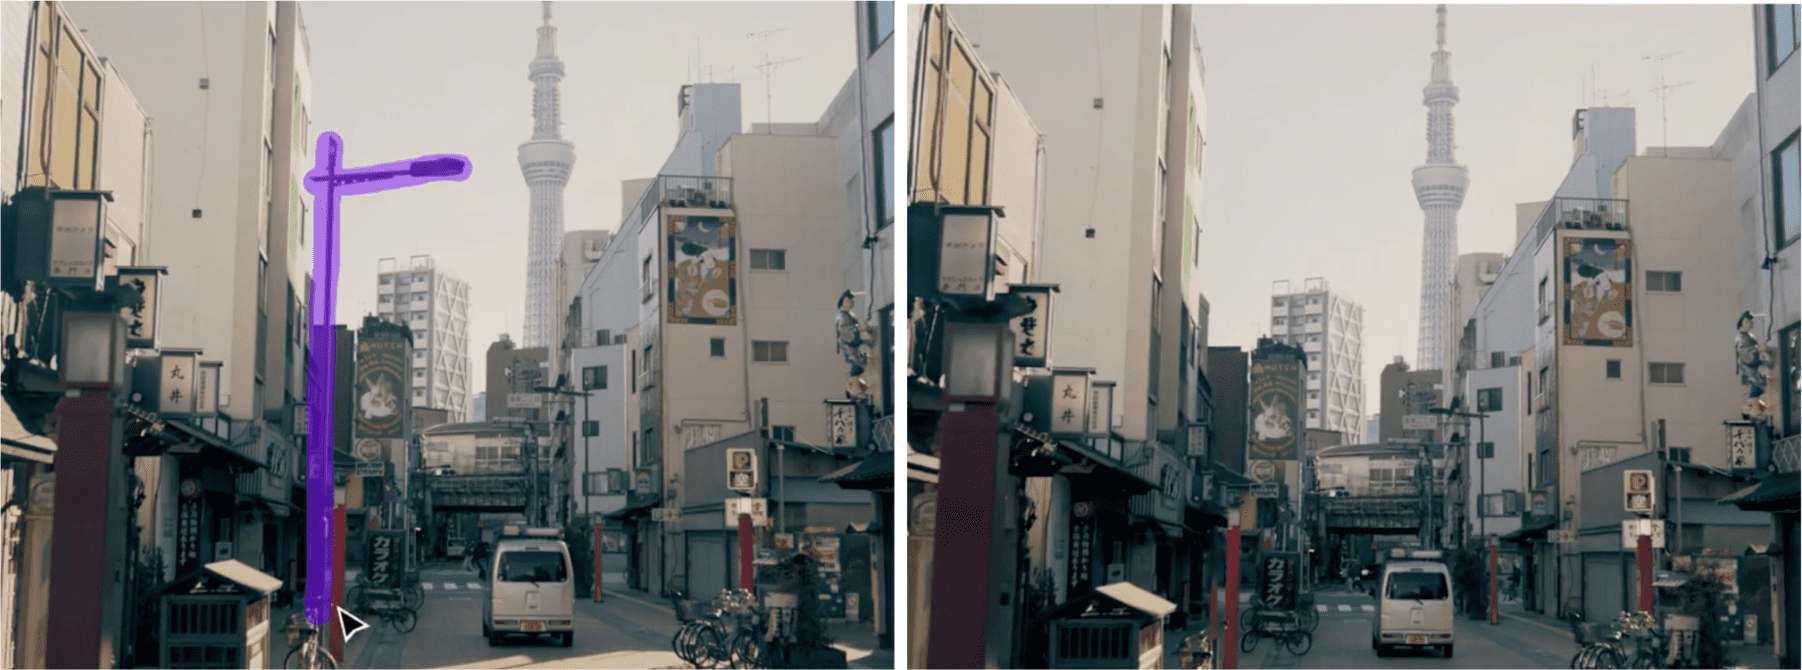
The right image is a frame of the same video of the left image, but modified by using inpainting for removing the colored light post present on the left image
4. Real-life example of the use of diffusion models
A real-life example of fine-tuning diffusion models to teach them specific concepts is the generation of images containing skin lesions.
Applying Deep Learning models and techniques to medical imagery often encounters a common challenge: the scarcity of well-labeled data of good quality. The phenomenons of data scarcity and class imbalance are quite common when working with these kinds of data. To address these problems, one effective approach is through data augmentation.
Using few real images, say between 5 and 20 images from the HAM 1000 dataset, we can create high-quality generated images of a certain skin lesion. These images can help improve the performance of classification, detection and segmentation models, among others, through data augmentation.
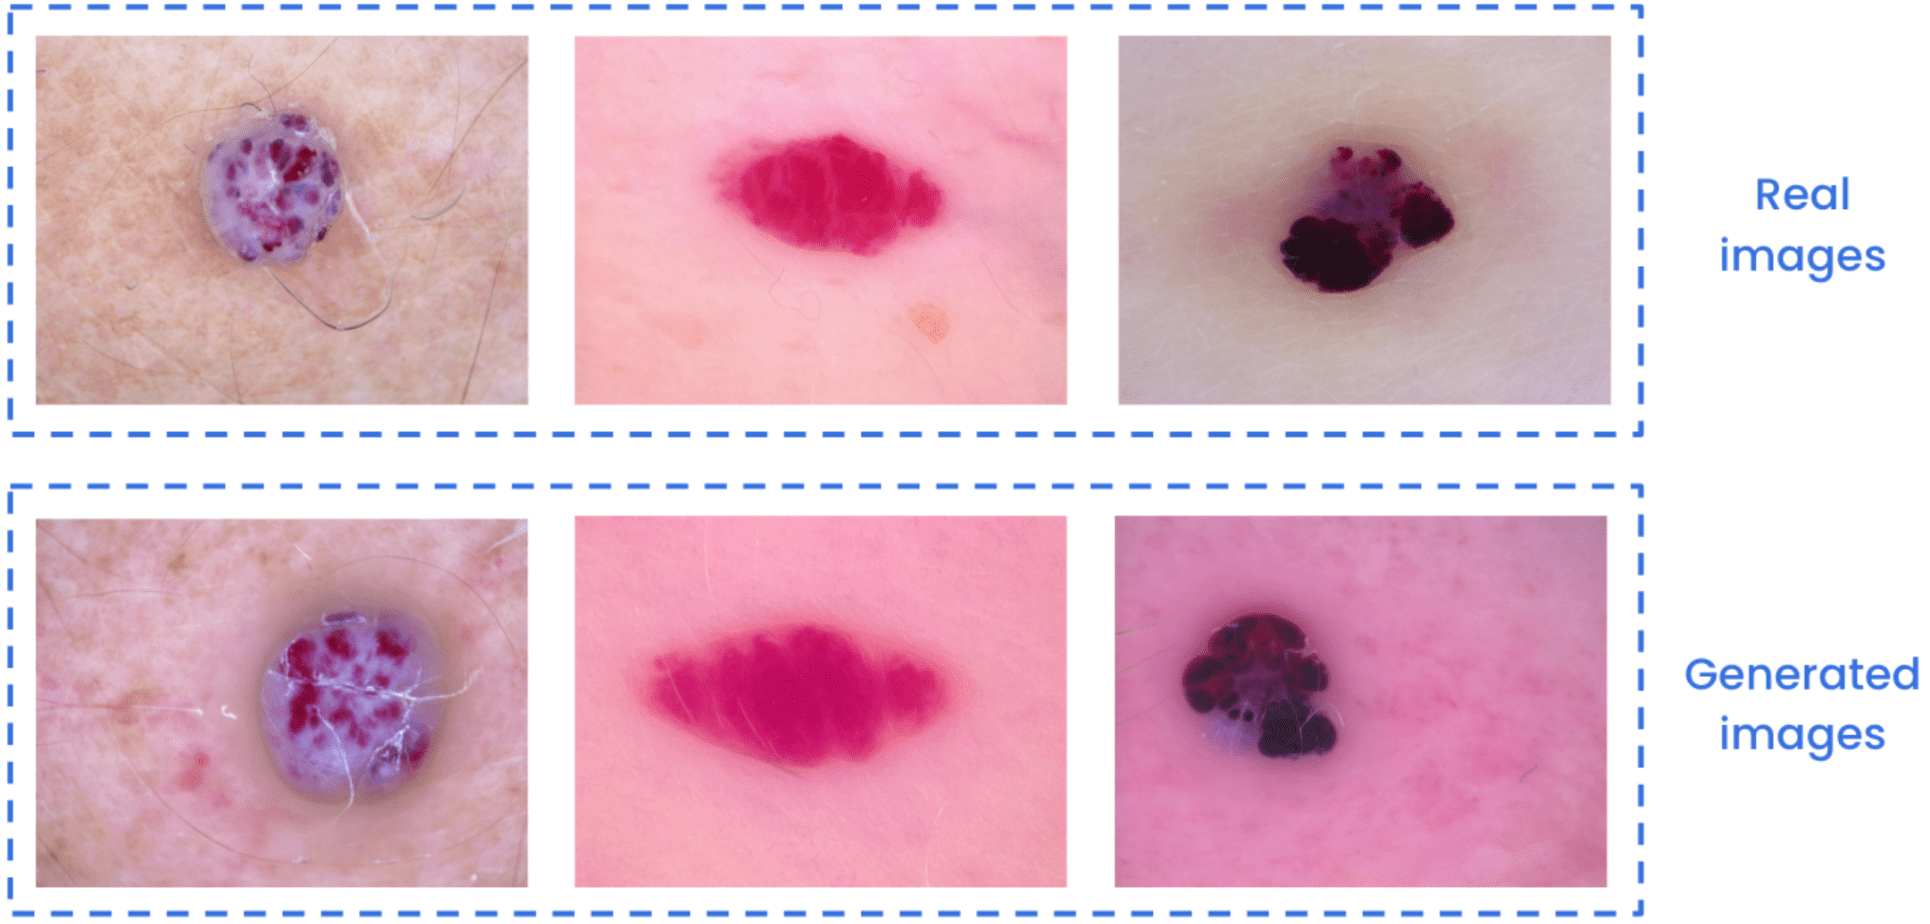
Comparison between real and generated images of vascular skin lesions.
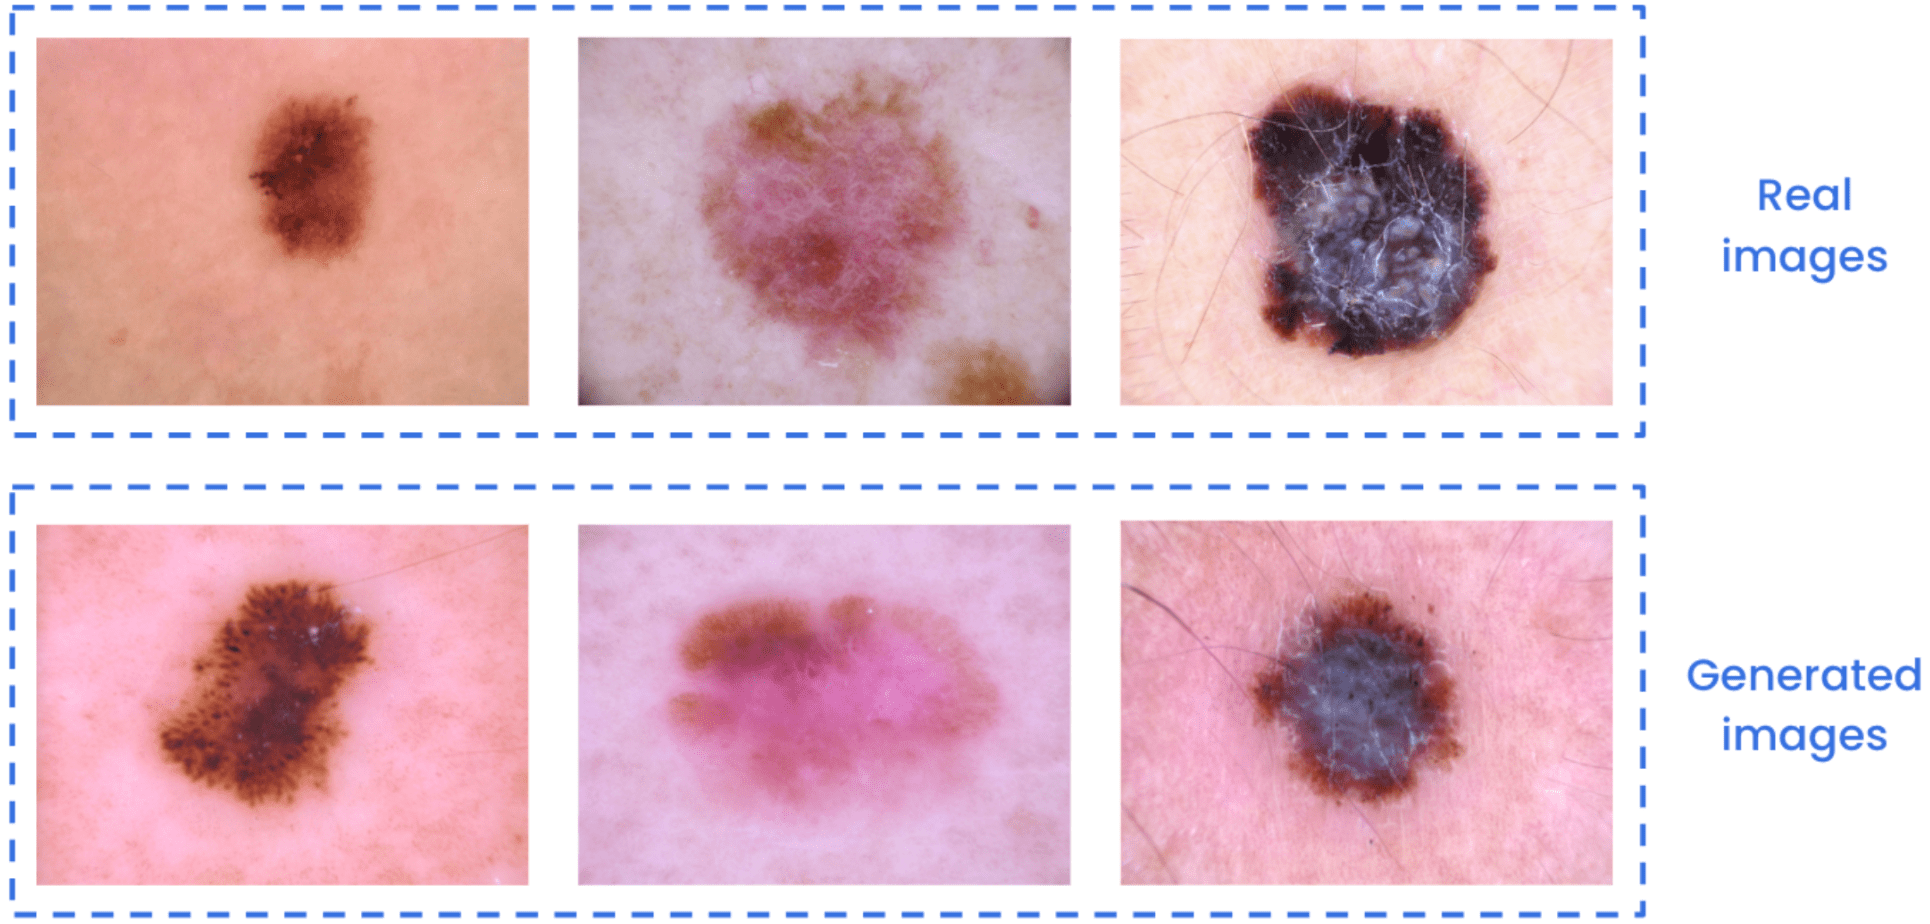
Comparison between real and generated images of melanoma skin lesions.
To assess the potential of the generated images, the classification problem for this dataset was addressed both with and without data augmentation. These non-real images were generated from the fine-tuning of a Stable Diffusion model. This evaluation focused on five out of the seven different skin lesions in the dataset for simplicity.
In this particular case, an EfficientNet-B0 classification model showed an improvement from 79.9% to 88.7% in the balanced accuracy metric and from 79.9% to 88.4% in the balanced recall metric. Achieving this improvement involved combining generated and real images, rather than relying solely on the dataset images. All calculations considered class imbalance, data leakage, and employed standard metrics specific to this dataset.
While results may vary depending on the use case and the effort invested in the fine-tuning of the diffusion model. This example provides just a glimpse of the possibilities with diffusion models.
5. Key Takeaways
There are several ways to improve the results from pre-trained diffusion models such as Stable Diffusion via fine-tuning. However, there’s no approach found to be better than the others across diverse use cases.
5.1 General guidelines
Some of the questions we should ask ourselves before trying out an implementation of these techniques are:
- How many different concepts, objects or styles do we want the model to generate?
If there are many, maybe DreamBooth wouldn’t be the to-go option.
- How difficult do we believe our concept is and are details truly important?
If we want a model to broadly learn a style, maybe a textual inversion model could be enough. However, if we want to replicate a certain object the most identical as possible or patterns that are not common in images datasets such as medical conditions, we could end up needing to train a LoRA model or even DreamBooth. Remember that textual inversions look for “the perfect prompt” where the visual phenomena has to be already known in Stable Diffusion pre-training. DreamBooth can actually insert new concepts never seen in SD pre-training.
- Are there any disk, RAM, speed or GPU requirements?
These are the main shortcomings of DreamBooth. If we need to have different SD models fine tuned with DreamBooth for excelling at different concepts, we may need more cloud infrastructure to hold them altogether.
- Do we need the output to follow a specific pattern? Say, a person with a certain pose, an object with certain edges or in a certain location of an image?
In these cases, the logical alternative would be to try some variation of ControlNets. Although other image-to-image alternatives could work well.
While these serve as general guidelines, it’s essential to recognize that each use case has its unique characteristics. Designing experiments requires careful consideration of these peculiarities to determine which architecture could yield optimal results.
5.2 Main tools to consider
It’s worth mentioning that there are two main tools we need to be aware while working with diffusion models, which can make our work a lot easier.
- The stable-diffusion-webui [8] provides a browser interface based on Gradio for Stable Diffusion, allowing easy installation, fine-tuning and inference over diffusion models. This repository provides a lot of features and parameters we can modify for observing different results. They also provide model optimizations and tricks for running these models on restrictive hardware.
- The diffusers [9] library, created by Hugging Face, is the go-to library for state-of-the-art pretrained diffusion models. These includes models for generating images, audio, and even 3D structures of molecules. This library provides a modular toolbox that supports both simple inference solutions and training your own diffusion models.
Generally, the diffusers library provides several abstractions to handle the boilerplate of code. This is generally linked to the definition of the components of these diffusion models, as well as different functionalities. Although there are some example scripts on how to train LoRA layers, textual inversion, among others, the training loop would generally be written for each use case.
On the other hand, the stable-diffusion-webui can handle all these for us, while being more like a black box. The main trade-off lies between easiness of implementation versus transparency of the components in the architecture. Also, we should take into account our needs in terms of defining the interactions of those components.
5.3 Final comments
Summing up, although diffusion models and Stable Diffusion in particular have shown incredible results for a plethora of different applications. For using these models in production, we would generally need to go an extra mile in performance to achieve the desired results. In this article we explored different state-of-the-art approaches to achieve these enhanced results, while mentioning the pros and cons of each one of them.
Interested in how diffusion models can generate consistent videos instead of images? Check out our blog on Diffusion models for video generation [10].
6. References
- Stable Diffusion XL Turbo demo
- An Introduction to Diffusion Models and Stable Diffusion
- ControlNet paper
- DreamBooth paper
- DreamBooth official webpage
- Textual Inversion paper
- LoRA paper
- Stable Diffusion Web UI
- Diffusers library
- Diffusion models for video generation
- Parameter-Efficient LLM Finetuning With Low-Rank Adaptation
- LoRA vs DreamBooth vs Textual Inversion vs HyperNetworks
- What are LoRA models
- How to fine-tune Stable Diffusion using LoRA

