Vertex AI + Kubeflow tutorial
By Federico Baiocco
Usually, taking a ML model from the experimentation environment to production consumes a huge amount of time and resources. Vertex AI makes it easy to train, deploy and compare model results. It is an excellent tool that allows us to focus on ML solutions rather than infrastructure management.
In the following post, we will dive deeper into Vertex AI. This is a step by step guide to define a Kubeflow pipeline which is going to deploy a custom ML model using Vertex ai and then make real-time inferences with the deployed model. We are going to train our model using a public dataset about crimes in Chicago; however, the model won’t be the focus of the tutorial and by the end you should be able to build your own pipelines to deploy any custom model to Vertex AI.
You can find the code used along this tutorial in this Github repository.
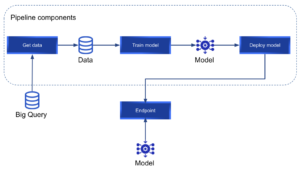
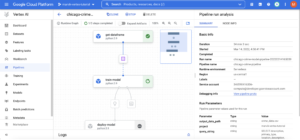
By the end of the tutorial, we want to achieve the following pipeline:
What is Vertex AI?
If we take a look at the official Vertex AI webpage:
“Vertex AI brings together the Google Cloud services for building ML under one, unified UI and API. In Vertex AI, you can now easily train and compare models using AutoML or custom code training and all your models are stored in one central model repository. These models can now be deployed to the same endpoints on Vertex AI.”
They mention that we can “train and compare models using AutoML or custom code training”. This tutorial will focus on custom code training rather than AutoML.
Vertex AI allows us to run pipelines using Kubeflow or Tensorflow Extended (TFX). In our case, we are going to use Kubeflow to define our custom pipeline.
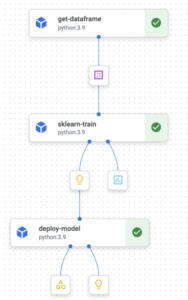
We will refer to the concept “pipeline” often in this tutorial. A pipeline is a set of components that are concatenated in the form of a graph. Each component will be a node of the graph and will perform a specific task. A Vertex AI Kubeflow pipeline looks like this:
Where each component can have inputs, outputs and is connected to the next one in the pipeline.
Kubeflow is an open source project designed to make deployments of ML pipelines on Kubernetes. It lets us define a series of components as python functions, these components will be the nodes of the pipeline we want to deploy. Each of the pipeline’s components will run on an isolated container; therefore, each component will install only the necessary Python packages for the current step.
It is a good practice to design pipelines promoting reusability of components. In order to achieve that, each component must have a single responsibility.
Google has defined a set of pre-built reusable components that can be found here. However, we can define our custom components to build our pipeline.
Setup
The following tutorial can be executed entirely on a free tier GCP account. To begin with, we are going to install and configure all the necessary packages.
- Install the GCP SDK. Follow the instructions on this link according to your operating system. Once installed, you should be able to run the “gcloud” commands. For example:
gcloud --versionwhere you should see something like “Google Cloud SDK 373.0.0″ and other versions listed.
- Next, in a project with billing already activated, the APIs must be activated.
- Login to GCP on your terminal with the command:
gcloud auth login - The command
gcloud initwill allow you to specify a project, region and zone. - Update and install gcp components:
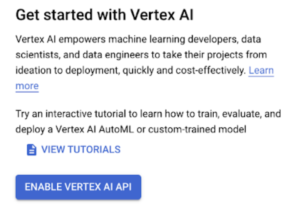
gcloud components update && gcloud components install beta - Activate Vertex AI in your project. In order to activate it, you need to navigate to the Vertex AI service on your GCP console and click on the “Enable Vertex AI API” button:
- Vertex uses cloud storage buckets as a staging area (to store data, models, and every object that your pipeline needs). Therefore, we need to create a new bucket for our pipeline. Bucket names need to be unique (there can not be 2 buckets with the same name even on different organizations). Create the new bucket with the command:
gsutil mb -p PROJECT_ID gs://BUCKET_NAME. Your project id can be found on the top bar of your GCP console:

When you press your project name a popup will be displayed and then you can see your project id: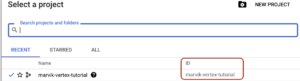
You can choose your own bucket name. - Regarding access control, you can either run your Vertex AI pipelines with the compute engine default service account or create a new service account with granular access. For the purposes of this post, we will use the compute engine default service account; therefore, you must enable the compute engine API. Next, you will need the number of your project. The command:
gcloud iam service-accounts listis going to list all of your service accounts:
The one you want is “Compute Engine default service account” and more specifically, you need the number that can be found in the EMAIL (346590416306 in my case).With this number on hand, we can run the next command to give this service account access to our recently created bucket:gsutil iam ch serviceAccount:[email protected]:roles/storage.objectCreator,objectViewer gs://BUCKET_NAME- PROJECT_NUMBER: is the number we just got (346590416306 in my case)
- BUCKET_NAME: the name of the bucket you created
- Later, when we want to run our pipeline, we will need to have a json key of our Compute Engine default service account. In order to get this json key, we are going to use the IAM service in our GCP console.
On the left panel, we need to navigate to the tab “Service accounts”: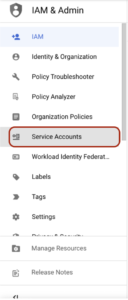
Once you are on this section, a list of service accounts will be shown:
Here you need to click on the “Actions” button and then navigate to the “Manage Keys” option: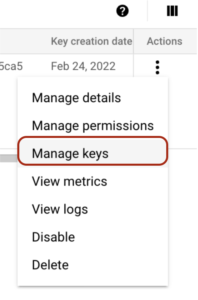 You have to click the “ADD KEY” button and create a new key:
Once created, a JSON key will be downloaded to your computer. You must keep it in a safe place and do not share it with anyone. We are going to use this key later when we want to run our pipeline. You are all set up! Let’s get to the fun sections where we are going to define our custom training pipeline.
The data and the model
Big Query has some publicly available datasets. In this case, we are going to use a dataset about crimes in Chicago.
The dataset consists of 7.491.936 samples about crimes with a short description, some other features and a boolean column indicating whether it ended up with an arrest or not. Data is from the year 2001 to the year 2022.
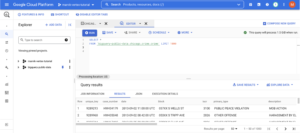
You can see more about this dataset running the following query in bigquery:
SELECT *
FROM `bigquery-public-data.chicago_crime.crime`
LIMIT 10
In our model, we are going to use the columns: primary_type, location_description, domestic and arrest. We want to predict whether a crime ended up with an arrest or not.
The used model will be a Random Forest; however, this won’t be the focus of our tutorial and you can try to improve the model as much as you want, or even use a different dataset and a different model.
Components
As mentioned before, a component will be a node in our directed graph (pipeline). Once compiled, a component will be represented as a .yaml file that Vertex will use later to run our pipeline.
Each component will be defined as a python function, with some peculiarities:
- A Python function that represents a Kubeflow component, will have the decorator:
@componentand within this decorator we need to specify:packages_to_install: since each component installs its own packages, we need to specify a list of packages to install for each componentbase_image: python:3.9 in our caseoutput_component_file: the name of the output .yaml file generated when the component is compiled
- A component can receive Inputs and generate Outputs. This needs to be specified in the parameters of the python function. For example, if our component named “train” receives a dataset as Input and generates a trained model as Output, our component definition could be:
@component( packages_to_install=["sklearn", "pandas"], base_image="python:3.9", output_component_file="train_component.yaml", ) def train( dataset: Input[Dataset], model: Output[Model] ): - As a component runs in an isolated environment, each component needs to import the necessary packages.
We are ready to start defining our components. In a new python file, import the necessary packages:
from kfp.v2 import compiler
from kfp.v2.dsl import pipeline, component, Artifact, Dataset, Input, Metrics, Model, Output, OutputPath
“dsl” means domain specific language and we will use these packages to define and interact with pipeline components.
We are going to use Inputs and Outputs to perform the communication between the components of our pipeline. Metrics will allow us to log some metrics or models metadata for further analyses.
After importing these packages, we need to define some constants:
PROJECT_ID = "YOUR_PROJECT_ID"
BUCKET_NAME = "gs://BUCKET_NAME/"
PIPELINE_ROOT = f"{BUCKET_NAME}pipeline_root/"
Here you need to put your project id, bucket name and you can leave the PIPELINE_ROOT as defined in the example.
Get the dataframe
The first component that we are going to define is get_dataframe. We mentioned above that a public dataset about Chicago crimes will be used. This dataset will be retrieved from Big Query. Therefore, we are going to store the query in a separated file.
In a .sql file write the following parameterized query:
SELECT DISTINCT
    primary_type,
    location_description,
    domestic,
    arrest
FROM `bigquery-public-data.chicago_crime.crime`
WHERE year > @year
In Big Query, parameters are specified with “@”.
Now, coming back to our main python file with our components definition, we are going to create the first component of the pipeline.
The definition of the first component is:
@component(
    packages_to_install=["google-cloud-bigquery", "pandas", "pyarrow"],
    base_image="python:3.9",
    output_component_file="get_crime_dataset.yaml"
)
def get_dataframe(
        query_string: str,
        year_query_param: int,
        output_data_path: OutputPath("Dataset")
):
    from google.cloud import bigquery

    bqclient = bigquery.Client(project="marvik-vertex-tutorial")

    job_config = bigquery.QueryJobConfig(
        query_parameters=[
            bigquery.ScalarQueryParameter("year", "INT64", year_query_param)
        ]
    )

    df = (
        bqclient.query(query_string, job_config=job_config).result().to_dataframe(create_bqstorage_client=True)
    )

    print(f"Dataset shape: {df.shape}")

    df.to_csv(output_data_path)
This component aims to perform a parameterized query to Big Query, transform the results to a Pandas dataframe and store the results in an output path (as you can imagine, the results will be stored in our staging Cloud Storage bucket).
We use the Big Query SDK to perform the parameterized query; therefore, google-cloud-bigquery needs to be installed in our component.
The output is stored in a generated output_data_path that can be accessed later to retrieve this data.
Model training
Next, we define the component to retrieve the data, train a random forest model, log some metrics and store our trained model.
The component definition is:
@component(
    packages_to_install=["sklearn", "pandas", "joblib"],
    base_image="python:3.9",
    output_component_file="model_component.yaml",
)
def train_model(
        dataset: Input[Dataset],
        metrics: Output[Metrics],
        model: Output[Model]
):
    import pandas as pd
    from sklearn.model_selection import train_test_split
    from sklearn.ensemble import RandomForestClassifier
    from joblib import dump
    from sklearn.metrics import accuracy_score, f1_score
    from sklearn.pipeline import Pipeline
    from sklearn.preprocessing import OneHotEncoder

    df = pd.read_csv(dataset.path)

    X = df[["primary_type", "location_description", "domestic"]].copy()
    y = df["arrest"].copy()

    X_train, X_test, y_train, y_test = train_test_split(X, y, test_size=0.2, random_state=42, stratify=y)

    random_forest_model = Pipeline([('vec', OneHotEncoder(sparse=False, handle_unknown="ignore")),
                                    ('clf', RandomForestClassifier())])

    random_forest_model.fit(X_train, y_train)

    acc = accuracy_score(y_test, random_forest_model.predict(X_test))
    f1 = f1_score(y_test, random_forest_model.predict(X_test))
    metrics.log_metric("dataset_shape", df.shape)
    metrics.log_metric("accuracy", acc)
    metrics.log_metric("f1", f1)
    dump(random_forest_model, model.path + ".joblib")
Within this component we define all the logic of our model. As we have categorical features , we define a pipeline that can handle this type of data. You can play with this step trying to add more features, make smarter feature engineering, hyperparameter tuning and so on.
As you can see in the parameters, this component takes one Input (the dataset) and generates 2 outputs (metrics and model).
After the model is trained, we compute f1 score and accuracy score. These scores are logged using the metrics output. Moreover, we add some metadata to these metrics: dataset_shape. All of these data can be easily accessed later from the GCP console and will be useful to compare pipeline runs. Besides, you could store this in a Big Query table to perform more detailed analyses.
Once our model is trained and metrics are logged, in the last line of our component definition, we dump our trained model (another output).
All of these outputs will be accessed later when we put everything together in the pipeline.
Deployment
Our third (and last) component will be in charge of the deployment. By deployment I mean to generate a new endpoint to consume our trained model in real time:
@component(
    packages_to_install=["google-cloud-aiplatform"],
    base_image="python:3.9",
    output_component_file="deploy_component.yaml",
)
def deploy_model(
        model: Input[Model],
        project: str,
        vertex_endpoint: Output[Artifact],
        vertex_model: Output[Model]
):
    from google.cloud import aiplatform

    aiplatform.init(project=project)

    deployed_model = aiplatform.Model.upload(
        display_name="chicago-crime-pipeline",
        artifact_uri=model.uri.replace("/model", "/"),
        serving_container_image_uri="us-docker.pkg.dev/vertex-ai/prediction/sklearn-cpu.1-0:latest"
    )
    endpoint = deployed_model.deploy(machine_type="n1-standard-8")

    vertex_endpoint.uri = endpoint.resource_name
    vertex_model.uri = deployed_model.resource_name
Making use of the aiplatform Python SDK, we deploy our trained model to an endpoint. We need to upload our model before deployment, and we do that with the “upload” function. As we are using sklearn, the usedserving_container_image_uri is us-docker.pkg.dev/vertex-ai/prediction/sklearn-cpu.1-0:latest however, you can use any pre-built or custom image. For example, if you want to use XGBoost, you can try us-docker.pkg.dev/vertex-ai/prediction/xgboost-cpu.1-4:latest.
Once our model is uploaded, we can get the endpoint. One of the most important parameters to define here is themachine_type. In this case we are using just a n1-standard-8 machine and it is enough. You can find other machine types here.
Putting it all together in the pipeline
We just defined all the necessary components to train and deploy our model. However, we defined isolated components and now we need to bind them together in a pipeline.
As components had the @componentdecorator, a pipeline will have the @pipelinedecorator.
Our pipeline definition will be:
@pipeline(
    pipeline_root=PIPELINE_ROOT,
    name="chicago-crime-pipeline",
)
def pipeline(
        query_string: str,
        year_query_param: int,
        output_data_path: str = "crime_data.csv",
        project: str = PROJECT_ID
):
    dataset_task = get_dataframe(query_string, year_query_param)

    model_task = train_model(
        dataset=dataset_task.output
    )

    deploy_task = deploy_model(
        model=model_task.outputs["model"],
        project=project
    )
Here we use thepipeline_rootdefined at the beginning. This is the cloud storage path where all of our artifacts are stored.
In the Python function, we call each of our components (in order) and get the results. In the first step (dataet_task) we have only 1 output and therefore in the next step (model_task) we access this output with: dataset_task.output.
However, in model_task we have 2 outputs (model and metrics); therefore, we access the model output as: model_task.outputs["model"].
Compile the pipeline
Last but not least, we need to compile the pipeline. This step will be in charge of generating the necessary .yaml and .json files.
At the end of your python file, paste the following code:
if __name__ == "__main__":
   compiler.Compiler().compile(
       pipeline_func=pipeline,
       package_path="chicago_crime_model_pipeline.json"
   )
When we run this Python script, our pipeline will be compiled and the components and pipeline files will be generated:
- chicago_crime_model_pipeline.json
- deploy_component.yaml
- get_crime_dataset.yaml
- model_component.yaml
Once we have run this script and have all the necessary .yaml and .json files, we can move on to the next step: running our pipeline.
Running our pipeline
We are ready to run our pipeline and get our model deployed to an endpoint on GCP. In the setup stage, we downloaded a .json file with an access key. Now is time to use it.
We need to export theGOOGLE_APPLICATION_CREDENTIALSenv variable. In order to export this variable you have to run the command: export GOOGLE_APPLICATION_CREDENTIALS = "path-to-json-key-file"in your terminal.
In a new Python file, paste the following code:
if __name__ == "__main__":
    from datetime import datetime
    from google.cloud import aiplatform

    aiplatform.init(project="marvik-vertex-tutorial", staging_bucket="marvik-vertex-tutorial")
    TIMESTAMP = datetime.now().strftime("%Y%m%d%H%M%S")

    with open("./crime_query.sql", "r") as query_file:
        query_string = query_file.read()

    print(TIMESTAMP)
    run = aiplatform.PipelineJob(
        display_name="chicago-crime-model-pipeline",
        template_path="chicago_crime_model_pipeline.json",
        job_id="chicago-crime-model-pipeline-{0}".format(TIMESTAMP),
        parameter_values={"query_string": query_string, "year_query_param": 2010},
        enable_caching=False
    )
    run.submit()
With this script, we can run our entire pipeline and get our model deployed.
Remember to export the GOOGLE_APPLICATION_CREDENTIALSenv variable before running the script.
This script reads the sql file as string and then runs the previously compiled file using the aiplatform Python SDK. All the parameters that we want to pass to our pipeline must be specified in the parameter_values dict.
For example, if you want to take more data you could try to change the year 2010 to 2001.
Once you have run this script:

You can navigate to the Vertex service on the GCP console and click on the “pipelines” tab.
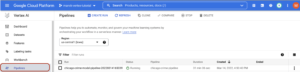
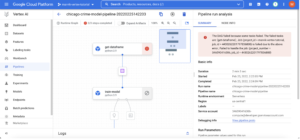
Here you will see a new run of your pipeline in state “Running”. You can open the pipeline by clicking on it:
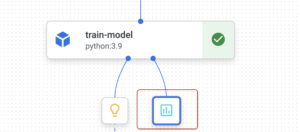
If your pipeline fails, you will see the red sign in the component that got the error. We can read the component logs in order to debug. To access the component logs, you must click on the component and then you will see a “logs” tab on the bottom.
The logs tab looks like this:
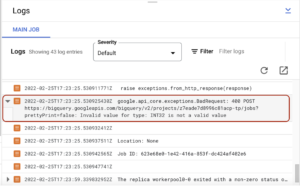
In my case, I had an error indicating that INT32 is not a valid value for a big query parameter type. I fixed it and run everything again. When your pipeline runs without errors, you will be able to see the succeeded status:
![]()
While your pipeline is running, it is storing some intermediate artifacts in your staging bucket. You can find them on the Cloud Storage GCP console. If you navigate to the bucket you created at the beginning, you will be able to see this: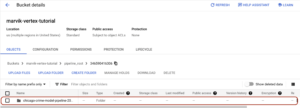
After the whole pipeline was run without errors, you can find a directory for each component.

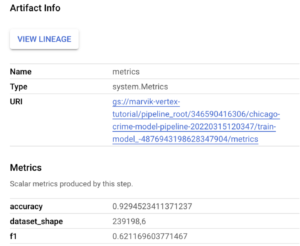
Results
During the training step, we logged some metrics. To find these metrics, you need to come back to the Vertex GCP console and navigate to your pipeline again. In the training step, you should have the metrics artifact.
When you click on it, logged metrics will be shown:
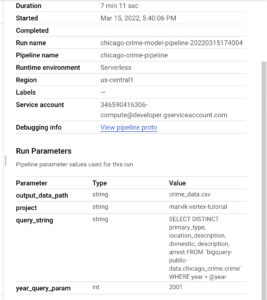
Moreover, if you click on the Summary tab, you can view the parameters that were used to run the pipeline:
By now you should be able to run your own Vertex pipelines and deploy custom models in GCP or even improve the one we developed during this tutorial. In the next steps, we are going to test our deployed model and automate pipeline runs.
Get real time predictions
If you navigate to the endpoints tab, you will see the endpoint we just deployed. Here you can click on the “Sample Request” button:

Then, on the “Python” tab, we are interested in the Python code shown:
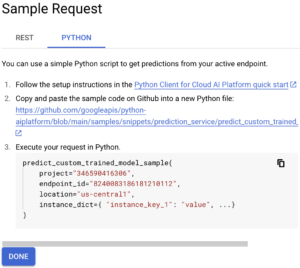
From this Python code, we will copy our project id, endpoint _id and location. Then, we will define a list of instances that we want to predict. For example:
["OBSCENITY", "RESIDENCE", "false"]
Now we can use the following code to call our endpoint and get predictions:
from google.cloud import aiplatform

def endpoint_predict_sample(
    project: str, location: str, instances: list, endpoint: str
):
    aiplatform.init(project=project, location=location)

    endpoint = aiplatform.Endpoint(endpoint)

    prediction = endpoint.predict(instances=instances)
    print(prediction)
    return prediction


if __name__ == "__main__":
    instances_to_test = [
        ["OBSCENITY", "RESIDENCE", "false"]
    ]
    endpoint_predict_sample(
        project="YOUR PROJECT ID",
        endpoint="YOUR ENDPOINT ID",
        location="us-central1",
        instances=instances_to_test
    )
The endpoint_predict_sample function is proposed by Google in their github repo.
Run the script and get real time predictions:
![]()
Clean up resources
This step is important to avoid undesired costs. However, if you are using the free tier google won’t charge you anything but you will spend your free credits. As we created models and endpoints, we need to remove them.
To remove models, we need to undeploy them. In order to undeploy a model, navigate to the “models” tab. Here you will see a list of models and a button with the sign “SHOW ENDPOINTS”. When you click on “SHOW ENDPOINTS” you will see the endpoint where each model was deployed:

You have to click on the endpoint and then in the following page undeploy the model as shown in the following image:

Once undeployed, you can come back to the models tab and delete the model and the endpoints on the endpoints tab.
Besides, as we mentioned before, while your pipeline is running it will create some files in your GCS bucket. We will remove these files.
Navigate to the bucket you created at the beginning and delete the pipeline_root directory. After that, you can remove the whole bucket.
We are done! 🎉 We built a Kubeflow pipeline to train a custom model retrieving data from Big Query and deployed it using Google’s service Vertex AI. Now you can try to develop your own pipelines with your own data.


Thanks for sharing. I read many of your blog posts, cool, your blog is very good. https://www.binance.com/cs/join?ref=S5H7X3LP