By Martín Beiro and Lucas Berardini

Tools make our lives easier. From the spears used by our ancestors to the computers we are using to write this blog, tools are a central part of our evolution as a species. Similarly, this same statement remains true for Large Language Models (LLMs) and their recent evolution – especially with the introduction of the Model Context Protocol. Not a long time ago, we started providing LLMs with custom tools, hugely expanding their capabilities and changing the paradigm. As a result, we went from purely using LLMs for generating text, to actually giving them the ability to perform actions, and therefore converting them into autonomous Agents. Web search, code execution and database interactions, among many others, can be found on many of the commercially available agents.
The initial days of developing Agents involved the implementation of tools from scratch. This required the developers to build a lot of boilerplate code for their own tools, and to adapt the code to each provider’s tools usage mechanism, whether it was OpenAI’s function calling, CrewAI tools, LangChain Tools, or any other available. Consequently, in this context of non-standardized practices, Anthropic introduced the Model Context Protocol (MCP), a standard designed to bring order to the chaos.
To clarify, Anthropic introduced the Model Context Protocol (MCP) — a standard designed to bring consistency to tool usage across different platforms. In this blog, we’ll review the Model Context Protocol and how it can simplify the development of your own agents. Additionally, we’ll show how building a basic MCP server to power your custom tools is easier than you might think.
What is Model Context Protocol?
Firstly, to explain what MCP is, let’s borrow the definition from the official protocol’s web site:
The Model Context Protocol (MCP) is an open protocol that enables seamless integration between LLM applications and external data sources and tools. Whether you’re building an AI-powered IDE, enhancing a chat interface, or creating custom AI workflows, MCP provides a standardized way to connect LLMs with the context they need.
Sounds amazing right? Well, it is.
In a nutshell, MCP is in charge of making available common resources for Agents in an LLM friendly way, without worrying about which LLM provider or vendor is accessing them. Similarly, just as USB-C standardizes the way of connecting anything to computers, MCP standardizes how you connect resources to Agents: through MCP Servers.
But what are resources? Weren’t we discussing about tools? Actually, tools are just one side of the story. Indeed, the protocol is designed to provide a one stop solution for all the usual things we want to provide to an Agent: documents, logs, images, prompts, available tools and more.
These Servers can be created by you, for your own use, or they can be created by a third party. In either case, the main concept behind this protocol is to build a collaborative environment for developing Agents. For instance, imagine that a team or individual developer builds, tests and maintains an MCP server you can use in your agents. Then, if the resources change in content or format, or if the features are expanded, you just update to the newest server, avoiding the need of dealing with the low-level details of each implementation.

How do I use MCP servers with my Agent?
Before jumping in, let’s define some key concepts:
- Host: Your custom Agent, or LLM powered Application. It can also be an application or IDE such as Cursor or Claude Desktop.
- Client: Responsible for maintaining 1:1 connections with servers, inside the host application.
- Server: Provide context, tools and prompts to the clients.
With that out of the way, we’ll explore what we need to get things going.
Case Study: Let’s say we are developing a system that deals with financial data related to a company and its subsidiaries, and we want to build an agent that can explore the core Postgres database of our application and give us insights useful for the finance team. Let’s build it with MCP.
Step 1: Getting the servers
The first step is finding the servers we would like to use in our Agent. You can build your own, for your custom tools and resources, and we will do so later in the blog, but for now we will focus on third party ones. There are many ways to find MCP servers, but our favorites are MCP Market and MCP Servers.

This page is an up-to-date catalog of the most interesting MCP servers available. On one hand, there are official servers developed directly by the resource providers themselves (Slack, AWS, Playwright, and many more). On the other hand, you’ll find non-official ones, created by users.
While searching, you might find that most servers mention desktop IDEs or clients such as Claude Desktop or Cursor. Do not worry about that, we can use them with our custom Python Agents too outside of a development environment.
Interaction alternatives
Servers come in two flavors, depending on how they talk to the clients:
- StdIO: To begin with, these run locally as executables and communicate directly with the server through standard input/output. Typically, they are distributed as Node.js packages and managed using npm. This is the original flavor, initially released by Anthropic.
- SSE: In contrast, these can run either locally or remotely as HTTP servers using Server-Sent Events (SSE), enabling communication with the client through that protocol. They are often Python applications, but any backend capable of handling SSE can be used. This is a newer kind, and not as widely spread, but is the key for providing remote access to the MCP servers to distributed end users.
Now, back to our Finance Agent. As mentioned before, the company’s information is stored in the PostgreSQL database. In that case, we can use the Postgres Server provided by the official MCP team to agentically interact with our data. This will allow the agent to see the table schemas, and run read only SQL queries, without the need for implementation!
Step 2: Setting up a client
Our host needs an MCP client so that it can connect to servers. If you are using an LLM powered application such as Cursor, feel free to skip this part, as most of them already include it (if not, pray that the developers add it sooner than later). For the more custom Agent path we have two options: we could definitely build our own, following the protocol’s guide, but we also can use one of the many Agent frameworks that support this, such as Google’s ADK or OpenAI’s Agent SDK.
We will create a Sample agent using Agent SDK:
from agents import Agent

agent=Agent(

   name="Data Analyzer",

   instructions="You are a financial analysis agent responsible for retrieving and analyzing financial and operational data for Wayne Industries from a PostgreSQL database. Use the available tools to complete your tasks efficiently and accurately",

   mcp_servers=[postgres_server]

)
Done, pretty straightforward, isn’t it? Now we only need for the postgres_server variable to point to the actual server.
Step 3: Connecting the Client and Server
Depending on the flavor of server you want to connect to, and the client, this procedure will vary. However, for the sake of simplicity, we will use our dummy agent to illustrate the procedure.
StdIO servers come with a console command as their way of running. For example, for our postgres server we have:
npx -y @modelcontextprotocol/server-postgres postgresql://localhost/mydb?user=other&password=secret
If we decompose this command, we can extract the following package information:
- Package manager: npx
- Name: @modelcontextprotocol/server-postgres
- Args: postgresql://localhost/mydbuser=other&password=secret (the connection string)
Most MCP servers follow this structure, but you might need to refer to each server’s documentation for clearing out any doubts.
SSE servers connect directly with a url. For example, if you were to launch one on localhost, on the port 42, your connection url would be:
http://localhost:42/sse
When it comes to the Agent SDK, two classes are defined separately for each flavor of Server, MCPServerStdio and MCPServerSSEE. Below is the code to connect to each one of our servers.
from agents.mcp import MCPServerSse, MCPServerStdio

postgres_server = await MCPServerStdio(
   params={
       "command": "npx",
       "args": ["-y" "@modelcontextprotocol/server-postgres", "postgresql://localhost/mydb?user=other&password=secret"],
   }
)

custom_server = await MCPServerSse(
        name="SSE Python Server",
        params={
            "url": "http://localhost:42/sse",
        })
By using this classes, you can start taking advantage of the world of servers available, either StdIO or SSE.
Step 4: Using the server
Although this step happens internally on the agents, we can peek inside. Some of the functionalities the server makes available for the Agent are:
Tools
These are code functions that the client can execute in the server, which can connect to external sources, databases, APIs, etc. The agent chooses when to use them and the arguments to call them with. In particular, the two most basic kind of tools are:
- List Tools: Provide descriptions on what tools are available and their signatures (parameters).
- Run Tools : Let’s the client run the listed tools.
File Resources
To begin with, file resources include any read only resource we want to provide as context for the agent, usually inserted as part of the prompt.
- List resources: Provides descriptions of all available files.
- Read resource: Sends back the resource file.
Prompts
After that, prompts define reusable message templates to guide LLM interactions with args, usually used in GUIs for fixed interactions.
- List prompts: Provides descriptions of available prompts and their arguments.
- Fill prompt: Lets the client fill a prompt and returns its complete text.
Finally, in the case of our Postgres toolkit, it comes with two functionalities
- Get schema, as a File Resource.
- Query, as a Tool.
Perfect, then we need to pass over the query as a tool to our agent, and insert the schema context as part of the prompt. However, if we take a peek at Agents SDK documentation, we only see mention of tools, weird right? What about Google’s ADK or Langgraph?
Well, after diving deeper it seems MCP (as of May 2025) support is dispar:
| Framework | Tools | File Resources | Prompts |
| Agents SDK | ✅ | ❌ | ❌ |
| Google ADK | ✅ | ❌ | ❌ |
| Langgraph | ✅ | ✅ | ✅ |
We could switch frameworks, as right now our codebase is pretty small, however, that would be no fun. There’s another way of solving that, we can extend Open AI’s MCP class to add a list_resources and get_resource. Under the hood, it uses the official mcp python sdk and its client session object, so we can do it with a few lines of code.
from agents.mcp import MCPServerStdio

class ExtendedMCPServerStdio(MCPServerStdio):
    def __init__(self, *args, **kwargs):
        super().__init__(*args, **kwargs)  # Initialize the parent class

    async def list_resources(self):
        return await self.session.list_resources()).resources

    def get_resource(self, uri):
        return await self.session.read_resource(uri).content
Now let’s test it. if we run the server, and list the resources, and get the following response:
Resources from local server: [Resource(uri=AnyUrl('postgres://localhost/last_quarter_subsidiary_financials/schema'), name='"last_quarter_subsidiary_financials" database schema', description=None, mimeType='application/json', size=None, annotations=None)]
Our full code for the agent, for the test query “Show me the last quarter financials for Wayne Industries subsidiaries” looks like this:
import asyncio
import os
import textwrap


async def main():

    db = os.getenv("POSTGRES_DB")
    user = os.getenv("POSTGRES_USER")
    password = os.getenv("POSTGRES_PASSWORD")

    connection_string = f"postgresql://localhost/{db}?user={user}&password={password}"
    local_server = ExtendedMCPServerStdio(
        name="Postgres Server",
        params={
            "command": "npx",
            "args": [
                "-y",
                "@modelcontextprotocol/server-postgres",
                f"{connection_string}",
            ],
        },
    )

    async with local_server:
        schema = await local_server.get_resource("postgres://localhost/last_quarter_subsidiary_financials/schema")
        prompt = textwrap.dedent(
            f"""You are a financial analysis agent responsible for retrieving and
            analyzing financial and operational data for Wayne Industries from a PostgreSQL database.
            Use the available tools to complete your tasks efficiently and accurately"
            The database schema is as follows:
            {schema}"""
        )
        agent = Agent(
            name="Assistant",
            instructions=prompt,
            model="gpt-4.1",
            mcp_servers=[local_server],
            model_settings=ModelSettings(tool_choice="auto"),
        )
        result = await Runner.run(agent, "Show me the last quarter financials for Wayne Industries subsidiaries", context={})
        print(result.final_output)

if __name__ == "__main__":
    asyncio.run(main())
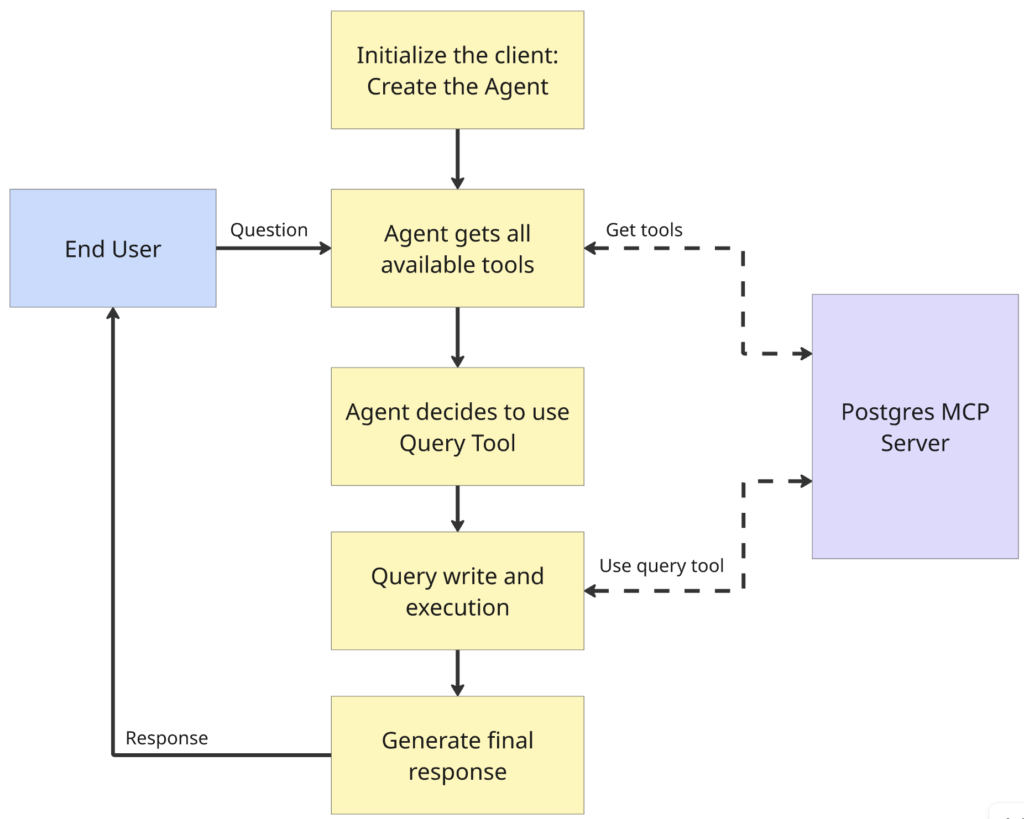
When run, the agent should flow as follows:
And as an output, we get:
Here are the last quarter financials for Wayne Industries subsidiaries:

| Company          | Revenue       | Profit        | Curr|
|------------------|---------------|---------------|------|
| TechCorp         | 5,000,000     | 1,200,000     | USD |
| Innovate Ltd     | 4,200,000     | 1,000,000     | EUR |
| Global Solutions | 3,000,000     | 800,000       | GBP |
| FutureWorks      | 600,000,000   | 150,000,000   | JPY |
| EcoWorld         | 2,500,000     | 600,000       | AUD |
Success, the agent lives ! But it looks like our multinational conglomerate does not unify the currency in their financial data, so results are harder to interpret. To solve this, we’d like to add new tools for the agent to be able to do FX conversions. Let’s go into the next section and add this.
Creating Your Own MCP Server
For the purpose of our financial Agent example, let’s imagine we need the following capabilities:
- At any time, we want to retrieve the exchange rate between two different currencies.
- We also want to be able to convert any amount of money in a given currency to a different one.
- Let’s also imagine only a subset of currencies are supported.
With this in mind, we are ready to build our new server, we will start by creating some helper functions.
import json
import yfinance as yf

def available_currencies() -> dict:
    with open("currencies.json", "r") as file:
        currencies = json.load(file)
    return currencies

def fx_rate(from_currency: str, to_currency: str) -> float:
    currencies = available_currencies()
    if from_currency.upper() not in currencies or to_currency.upper() not in currencies:
        raise ValueError(f"Invalid currency code: {from_currency} or {to_currency}")

    ticker = f"{from_currency.upper()}{to_currency.upper()}=X"
    data = yf.Ticker(ticker)
    fx_data = data.history(period="1d")
    if fx_data.empty:
        raise ValueError(f"Could not fetch FX rate for {from_currency} to {to_currency}")
    rate = fx_data['Close'].iloc[-1]
    return rate
def currency_conversion(amount: float, from_currency: str, to_currency: str) -> float:
    rate = fx_rate(from_currency, to_currency)
    converted_amount = amount * rate
    return converted_amount
Imagine also that currencies.json includes something like the following:
{
    "USD": "United States Dollar",
    "EUR": "Euro",
    "GBP": "British Pound Sterling",
    "JPY": "Japanese Yen",
    "CHF": "Swiss Franc",
    "CAD": "Canadian Dollar",
    "AUD": "Australian Dollar",
    "NZD": "New Zealand Dollar",
    "CNY": "Chinese Yuan"
}
This will serve as the “static” set of supported currencies. With these helper functions in place, we are ready to build the server. Moreover, for the Python advocates out there, a cool tool for building servers in a pythonic way was released not long ago, and it’s called FastMCP.
FastMCP allows us to declare tools, resources and queries using a decorator syntax, pretty similar to how HTTP routes are declared in FastAPI. Following the syntax, this simple server would be something like this, keep in mind that providing good description to the tools and resources is critical in this scenario:
from fastmcp import FastMCP

# Create a server instance
mcp = FastMCP(
    name="FXCalculatorServer",
)


@mcp.resource("config://currencies")
def get_available_currencies() -> list[str]:
    """
    Fetches all the available currencies, their tickers and names.
    """
    return available_currencies()


@mcp.tool()
def get_fx_rate(from_currency: str, to_currency: str) -> float:
    """
    Fetches the current FX rate from Yahoo Finance from the from_currency to the to_currency.
    Currencies need to be provided as tickers, as can be found in the get_available_currencies() source.
    """
    return fx_rate(from_currency, to_currency)

@mcp.tool()
def convert_currency(amount: float, from_currency: str, to_currency: str) -> float:
    """
    Converts a given amount from one currency to another using the latest FX rate.
    Currencies need to be provided as tickers, as can be found in the get_available_currencies() source.
    """
    return currency_conversion(amount, from_currency, to_currency)

mcp.run()
And that ‘s it! We are ready to deploy our server and feed it into our Agent. We will use SSE as transport layer in this example:
fastmcp run src/server/app.py --transport sse --port 9000
Now, we can add a new client and feed both toolkits to our agent.
## local server connection
...
###
remote_server = MCPServerSse(
        name="SSE Python Server",
        params={
            "url": "http://127.0.0.1:9000/sse",
        })

    async with local_server, remote_server:
        ## prompt creation
		...
	 ###
        agent = Agent(
            name="Assistant",
            instructions=prompt,
            model="gpt-4.1-2025-04-14",
            mcp_servers=[local_server, remote_server],
            model_settings=ModelSettings(tool_choice="auto"),
        )
And we now test it with the prompt “Show me the last quarter financials for Wayne Industries subsidiaries, all in USD”, we will see that the Agent queries the data as before, and then applies currency conversions, to generate the final result:
Here are the last quarter financials for Wayne Industries subsidiaries, all amounts converted to USD:

| Subsidiary             | Revenue (USD)      | Profit (USD)    |
|------------------------|--------------------|-----------------|
| TechCorp               | $5,000,000.00      | $1,200,000.00   |
| Innovate Ltd           | $4,699,563.50      | $1,118,943.69   |
| Global Solutions       | $3,982,212.78      | $1,061,923.41   |
| FutureWorks            | $4,112,941.49      | $1,028,235.37   |
| EcoWorld               | $1,600,194.57      | $384,046.70     |
Works like a charm!

If you’d like to take a peak, the full repo can be found here: https://github.com/marvik-ai/mcp-financial-agent
Final thoughts
Throughout this blog, we explored what MCP Servers are at a high level, and then we saw that it’s pretty simple to implement a custom solution as MCP server to extend the capabilities of our own Agents. However, it is clear that the main philosophy behind this technology is to standardize the way we connect the Agents with tools and resources, with the ultimate goal of reusing already existing servers.
Additionally, we also checked that currently the most common frameworks for developing Agents “support” MCP. Nonetheless, they are not mature enough to fully take advantage of all the MCP potential, besides just using tools. Ultimately, only time will tell if this technology becomes a global standard in the AI community, but it’s looking quite promising at the moment.

