By Santiago Aznarez
Introduction
Making a prototype of a Machine Learning solution is crucial, it acts as a cornerstone for effective problem-solving. Because it lets you quickly test and validate ideas, which is key in a field such as Machine Learning, characterized by complex algorithms and unpredictable data patterns. Through this process, teams can quickly assess the viability of a project, saving time and resources that might otherwise be spent on unviable ideas.
In this blog, we’ll dive into how Azure enables quickly, code-free prototyping in machine learning. Also, prototyping a project idea on the go.
Join us to discover how you can prototype your ML solution with Azure’s powerful yet user-friendly tools, making machine learning accessible to all.
Why is Prototyping Important?
Machine Learning projects are often charged with uncertainties; Is the project attainable? Is the data good enough? However, hard questions like these can be answered in the prototyping phase, bringing clarity to the whole project.
In the upcoming sections, we’ll develop a Machine Learning classifier aimed at predicting heart failure. We’ll use the Heart Failure Prediction Dataset, which is publicly available. Our journey will encompass several key stages:
- Labeling Process: We’ll begin by detailing how to label the dataset effectively, preparing it for accurate model training.
- Model Training: We’ll train our model using the Azure’s AutoML tool. This phase includes selecting the right parameters and running the automated training process.
- Model Deployment: Finally, we’ll deploy our trained model, creating an operational endpoint for practical use.
Setting up the Azure Workspace
To begin with Azure, you’ll need a subscription. If you don’t already have one, you can sign up for a trial subscription at the provided link.
After acquiring your Azure subscription, proceed as follows in the Azure Portal:
- Use the search bar to find Resource groups.
- Create a new Resource group. This serves as a container for all related Azure solution resources.
- In the newly created Resource group, select create Resource and look up Azure Machine Learning.
- Go ahead and establish an Azure Machine Learning resource. Note that setting this up might take a few minutes.
- Once your Azure Machine Learning resource is ready, click on Launch studio within it.

How to label your Dataset
In supervised learning, algorithms learn from labeled datasets. These labels serve as the ground truth, guiding the model to understand the correlations between input features and the corresponding outputs. So, without labels, the model would have no reference point to learn from.
For our prototype, we’ll be using a pre-labeled tabular dataset, eliminating the need for manual labeling. However, if your project involves working with images, text, or audio data, the Azure ML labeling tool can significantly simplify the labeling process.
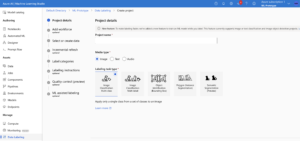
The Azure Data Labeling tool offers various labeling options for specific Machine Learning tasks. For Computer Vision problems, it provides options like Image Classification and Semantic Segmentation. Similarly, different options are also available for Text and Audio data types.
Configuring your Data Labeling project in Azure offers several beneficial options:
- Workforce: You can opt to use a vendor labeling company from the Azure Marketplace, providing expert assistance in data labeling.
- Incremental Refresh: This feature ensures your dataset is regularly checked for new data points. Any additions, like new images in an image classification dataset, will be automatically included as tasks in the labeling project.
- Quality Control: Implement a system where each asset receives multiple labels. These labels can then be reviewed collectively to establish a consensus label, enhancing the accuracy of your data.
- ML Assisted Labeling: Boost the efficiency of your labeling project by enabling ML assisted labeling. This feature trains a model to preliminarily label data, which your labelers can then review and finalize.
Upload your Dataset
To upload your dataset to Azure, follow these steps:
- Begin by downloading the dataset from Kaggle.
- Navigate to Data in the left menu within Azure ML Studio.
- Click on Create data asset.
- Select Tabular as the data type.
- On the subsequent screen, choose From local files as your data source and proceed to the next step.
- Pick the datastore for storing your dataset. For instance, select Azure Blob Storage.
- Select the dataset from your local files.
- For the upcoming steps, keep the default options.
Automated Machine Learning
Automated Machine Learning involves automating repetitive and time-consuming tasks that are involved in the machine learning model development. This empowers data scientists, analysts, and developers to construct high-scale, efficient, and productive ML models, while ensuring sustained model quality. Also, it democratizes Machine Learning by helping no technical experts on developing this kind of solutions.
Azure AutoML stands out as an excellent tool in the Azure Machine Learning service, streamlining the intricate aspects of machine learning by focusing on model selection and hyperparameter tuning. In the domain of model selection, this tool efficiently automates traditionally time-consuming tasks. It intelligently explores diverse machine learning algorithms, choosing the most suitable one for a given dataset and problem.
Also, another crucial capability of Azure AutoML is its automation of hyperparameter tuning. Hyperparameters play an important role in determining optimal settings for machine learning algorithms, directly influencing model performance. Azure AutoML addresses this by automating the exploration of the hyperparameter space and searching for the most effective configuration for the chosen algorithm.
As mentioned, Azure AutoML boasts numerous advantages. By automating model selection and hyperparameter tuning, it significantly reduces the time and effort invested in developing high-quality machine learning models. Moreover, its accessibility enables individuals with varying levels of expertise to harness the power of machine learning without an in-depth understanding of algorithm intricacies. Finally, integral to Azure AutoML, is its seamless integration within the Azure Machine Learning service, facilitating a smooth transition from model development to deployment.
Azure AutoML serves as a robust and efficient tool, empowering data scientists and developers to capitalize on the potential of machine learning while mitigating the complexities associated with manual model development.
Run an AutoML Experiment
Follow these steps to run an Automated ML experiment for predicting Heart Failure:
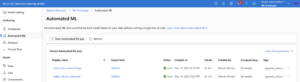
- Initiate AutoML Job: In Azure ML Studio, click on Automated ML on the left sidebar, then select New Automated ML job.
- Fill in Basic Information: Provide the necessary details about your Automated ML job.
- Select ML Task: Choose Classification as the Machine Learning task, as the goal is to predict heart failure based on symptoms.
- Choose Dataset: Select the dataset you’ve previously uploaded.
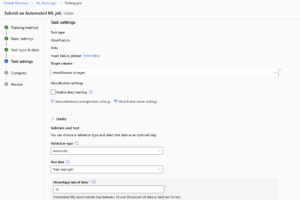
- Configure Task Settings:
- Set HeartDisease as the target column.
- Then, under View additional configuration settings, you can choose the primary metric for model performance, exclude specific models, and more. For now, let’s leave the default options.
- In View featurization settings, you can decide how to handle missing data, and define variable types (e.g., categorize an input variable).
- In Limits, you can set up early stopping options. But just stick to the default values for now.
- Validate and Test:
- Keep Validation type as Automatic.
- For Test Data, select Train-test split, and 15% as Percentage test of data. This means that 15% of the dataset will be used to test it, and the other 85% will be used for training.
- Finalize and Submit: Leave other settings as default and submit the training job.
AutoML Experiment results
The training job will appear on the Automated ML page. Once it’s finished, click on it to see the results. Inside the training job, go to the Models + child jobs tab, there you will see all the algorithms that were trained during the process, with their corresponding metrics.
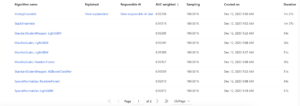
As you can see, many different models were trained, from Logistic Regressions to XGBoosts. The best performing model is at the top, a Voting Ensemble. Basically, its a set of multiple models that work together to make a prediction. Click on it to see the model resulting metrics and some other interesting information about it.
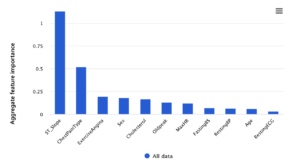
The most interesting information about the model is on the Explanations and Metrics tabs. On the explanations tab, explainability information about the model is available, from dataset information, to global and individual feature importance.
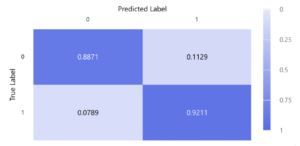
On the other hand, on the Metrics tab, you will find all the performance metrics related to the machine learning model, accuracy, recall, precision, F1 score, etc. As well as some curve plots and confusion matrices, for validation and test set.

So, without a single line of code, we got a model that can predict Heart Failure with 90% accuracy! To wrap up, lets deploy the model to a functioning endpoint.
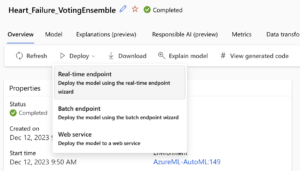
Deploy the Resulting Model
Deploying trained ML models is really easy within Azure Machine Learning. To deploy the best model from your AutoML run, simply click on ‘Deploy’ within the model’s details, and select the option that best suits your solution. Real-time endpoints are ideal for scenarios requiring immediate inference and low latency, particularly suitable for simpler models with smaller input sizes. On the other hand, ‘Batch endpoints’ are designed for deploying heavier models or pipelines that require asynchronous processing, handling larger and more complex tasks efficiently. For our Heart Failure Classifier, we’ll opt for a Real-time endpoint. For this deployment, we can stick with the default endpoint settings.
After the deployment process is done, the new endpoint will be listed under Endpoints in the left side menu. Inside the endpoint page, a range of functionalities are available. Including testing the endpoint (making inferences), accessing the code for endpoint consumption, monitoring request activities, examining logs, among others.
To make inferences on the model, navigate to the Test tab inside the endpoint page. Fill in the JSON structure with the required input variables, like in the following image, and then click the ‘Test’ button. You’ll see the results of the inference displayed on the right side of the screen. This process allows you to evaluate the model’s performance using real data inputs.
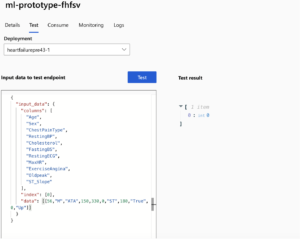
As seen on the image above, for the symptoms specified on the “data” field, the model predicted a “0”, meaning that the patient’s heart is probably healthy. While a “1” would suggest a potential heart health issue.
Final Thoughts
As we wrap up our journey through the world of code-free prototyping with Azure, we notice some key insights. The process from setting up an Azure workspace to deploying a fully functional ML model, all without writing a single line of code, highlights the significant progress made in making machine learning more accessible and efficient.
- Making Machine Learning More Accessible: Azure’s intuitive interface, along with powerful tools like AutoML and the Azure ML labeling tool, makes machine learning accessible to a wider audience. This shift is about more than just simplifying processes; it’s about enabling individuals without technical expertise to participate in ML-based problem-solving.
- Efficiency and Speed: The case study of developing a heart failure prediction model highlighted the speed and efficiency of Azure’s ML tools. Azure automates labor-intensive tasks such as model selection and hyperparameter tuning, which enables rapid prototyping.
- Scalability and Adaptability: Azure’s Machine Learning platform is not only for prototyping, but also scales to support production models. This scalability ensures that the transition from a prototype to a production environment is smooth, maintaining the integrity and performance of the ML models.
To sum up, Azure’s code-free machine learning environment presents a paradigm shift in how we approach ML solution development. Its combination of accessibility, efficiency, and power opens up new possibilities for innovation, making it a great tool for anyone looking to harness the potential of machine learning.

