How to optimize your model with TF-TRT for Jetson Nano
By Martín Beyer
In this post we will grab a Tensorflow 2 model, optimize it with NVIDIA TensorRT, and deploy it for inference on a JetsonNano.
First of all, is optimizing necessary? Short Answer: no. You might have reached to the conclusion that using TensorRT (TRT) was mandatory for running models on the Jetson Nano, this is however, not the case, if your raw model fits in Jetson’s memory you will be able to run it without any optimization.
Why are we stating this? Because optimizing the model might be too much hassle, and if inference time is not an issue, you can leave this step for a later time, since the code changes on the inference side are minimal.
However, if you’re up for a challenge, the potential gains are very good, up to 2X improvement in FPS, and about half the memory usage.
1. Context
What is TensorRT?
We won’t get into much detail here since it’s far too complex, but basically TRT is a library to optimize and run high performance deep learning models. It’s core is written in C++ and has several ways of being used:
- Standalone use without any framework
- Use in conjunction with Tensorflow
The first way runs the model end-to-end on the TRT runtime, and is very different (with lower level code) from what we are used to with modern deep learning frameworks, it has the advantage of being potentially faster, and also avoids any overhead from Tensorflow (mainly regarding installation size). With this method, you could import models from any other framework, such as PyTorch, and convert them to TRT (if you are interested in Torch see: torc2trt).
The second, is a hybrid between TRT and Tensorflow (called TF-TRT), in which the main player is Tensorflow (TF), but different from usual, it delegates the execution of some operations to a component of the TRT runtime, called TRTEngine. This option, has the benefit of being quite similar to the regular TF workflow, with the addition of an optimization step sandwiched in between training and inference.
In addition TF-TRT is able to handle models which contain unsupported TRT operations, only optimizing the “segments” with supported ops. Pure TRT would not be able to run such model.
In this post we will be following the second approach for the benefits already explained.
How it works?
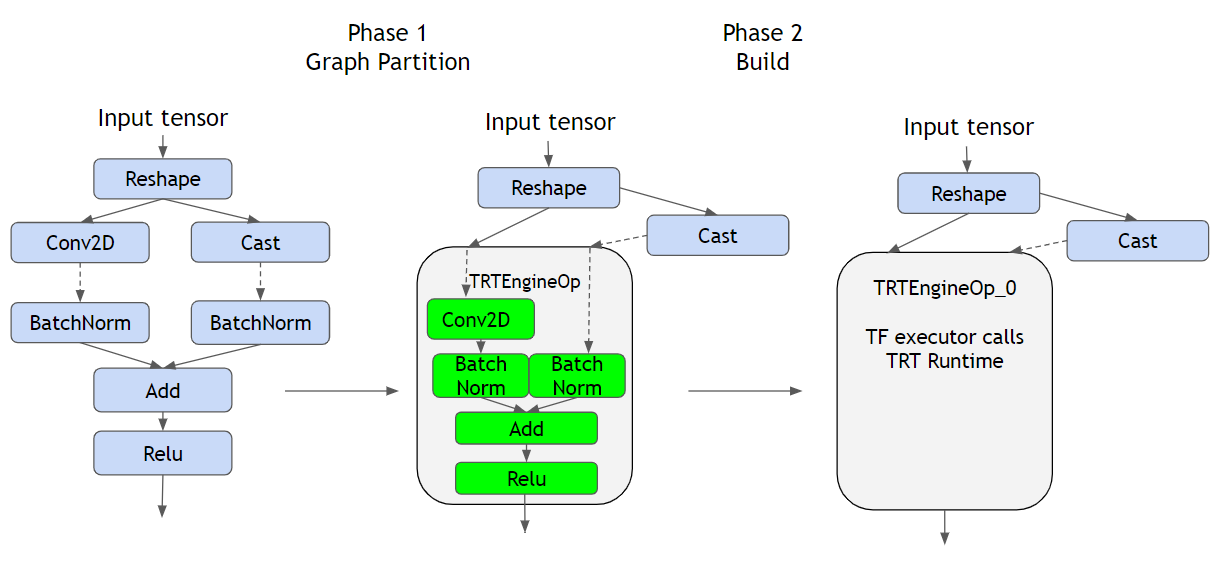
As you can see from the figure above, on the left we see a regular TF graph representing the operations defined by the model, on the middle we have the converted model, and on the right we have the built hybrid with the TRTEngine.
First the conversion step (Phase 1) identifies segments or subgraphs compatible with TRT to be replaced with TRTEnginesOps. In order to understand what a TRTEngineOp is, we must first understand how TF runs inference when we provide an input; data follows the operation’s graph, orchestrated by TF (most likely in C++ code on the CPU), this means that TF gathers outputs from parent operations and feeds them to its descendants as inputs.
If the operation is GPU compatible, likeConv2D, most likely a Cuda Kernel will be created and the operation will be performed by the GPU, but after it outputs its result, TF will get it and proceed. ATRTEngineOp(which contain multiple ops inside) is an special operation provided by the TF-TRT plugin, which executes as if it were a native TRT graph, this delegates TF’s responsibility of running the GPU ops to the TRT runtime allowing for total control of the graph and how operations are executed, resulting in being able to optimize for the target hardware.
To see which type of optimizations are done by TRT see https://docs.nvidia.com/deeplearning/tensorrt/best-practices/index.html#enable-fusion.
Secondly, the build step is where the optimizations are actually done, its quite confusing at first, but the conversion step only checks and marks the parts of the graph that are supported (and that in turn will be optimized). There is a very important thing to note:
This step MUST be executed on the target hardware, because its GPU specific -since it leverages the specific capabilities of the unit- this means that if you intend to run inference on the Jetson Nano, you have to execute this step on it.
2. Optimization How-TO
Below you will find the steps needed to go from a Tensorflow-Keras model to running fast inference on your Jetson Nano.
The main steps are:
- Train the model
- Save
- Optimize
- Deploy
- Infer
Despite optimization step, this looks like the usual workflow for most of machine learning projects. In this post, we will center on steps 3, 4 and 5.
Jetson’s Setup
from __future__ import absolute_import, division, print_function, unicode_literals
%env TF_GPU_ALLOCATOR=cuda_malloc
%env PROTOCOL_BUFFERS_PYTHON_IMPLEMENTATION=cpp

import os
import time
import numpy as np
import tensorflow as tf
from tensorflow import keras
from tensorflow.python.saved_model import tag_constants
from tensorflow.keras.preprocessing import image
from google import protobuf

print("Tensorflow version: ", tf.version.VERSION)
print("Protobuf version:", protobuf.__version__)
print("TensorRT version: ")
!dpkg -l | grep nvinfer-bin
Tensorflow version:  2.3.1
Protobuf version: 3.8.0
TensorRT version: libnvinfer-bin      7.1.3-1+cuda10.2
DISCLAIMER: Unfortunately we experienced that the process is very brittle to the versions of the libs so we are listing the current versions, so if you have the possibility, try to install these. In particular we are using JetPack 4.4.1, TF 2.3.1 for which you must follow this guide to install it.
%env TF_GPU_ALLOCATOR=cuda_mallocsets an environment variable inside a Jupyter notebook cell, if running this as a python script, execute priorexport TF_GPU_ALLOCATOR=cuda_malloc
Jetson’s memory management
On the Nano, since the GPU does not have it’s own memory, it shares the RAM with the CPU, this leads to Out of Memory (OOM) issues, we have found after trial and error that setting a memory limit of 2GB solves all issues. Beware, if the model you are using is bigger, you might have to fiddle with this value.
gpu_devices = tf.config.experimental.list_physical_devices('GPU')
tf.config.experimental.set_memory_growth(gpu_devices[0], True)
tf.config.experimental.set_virtual_device_configuration(
            gpu_devices[0],
            [tf.config.experimental.VirtualDeviceConfiguration(
               memory_limit=2048)]) ## Crucial value, set lower than available GPU memory (note that Jetson shares GPU memory with CPU)
Model preparation
Before we optimize our model, we must first convert it to the SavedModel format, as it is required in a later step. We are using a ResNet50 for demo purposes, here you would use your already trained model.
from tensorflow.keras.applications.resnet50 import ResNet50
from tensorflow.keras.applications.resnet50 import preprocess_input, decode_predictions

model = ResNet50(weights='imagenet')
model.save(f'resnet50_saved_model')
Conversion step
As we talked before, in this step TF-TRT identifies parts of the graph that are available for conversion, in our case, the entire network is replaced.
%env TF_CPP_VMODULE=segment=2,convert_graph=2,convert_nodes=2,trt_engine=1,trt_logger=2
from tensorflow.python.compiler.tensorrt import trt_convert as trt

conversion_params = trt.DEFAULT_TRT_CONVERSION_PARAMS
conversion_params = conversion_params._replace(max_workspace_size_bytes=(1<<30))
conversion_params = conversion_params._replace(precision_mode="FP16")
conversion_params = conversion_params._replace(maximum_cached_engines=10)

converter = trt.TrtGraphConverterV2(
    input_saved_model_dir="resnet50_saved_model",
    conversion_params=conversion_params)

converter.convert()
First we are setting some very important values:
max_workspace_size_bytes: This tells TRT how much room it has to optimize, its value is crucial, since if its too high or too low it won’t work. In a later step we will talk about how to know if the value was set correctly.1<<30is equal to 1GiB.precision_mode: This indicates TRT in which mode to store the variables,FP16means Floating Point 16 bits, which is not the normal mode for TF’s operations (by default ops on the GPU run with FP32 variables). As implied by the name, FP16 takes half the amount of bits so memory consumption is ~halved, also since the amount of bits per variable is much smaller, operations between variables are much faster. This is one of the reasons (but not the only one) of why we gain so much throughput. FP32 is needed during training in order to allow for small increments in weights, but it does have a very small impact in precision during inference.maximum_cached_engines: This value is not as critical as the others, it has to do with one part of TF-TRT that will be later explained, called TRTEngines.
TRTEngines: As we talked before, for each TRT compatible subgraph, aTRTEngineis created. Engines are created for each input size, in most cases the model’s input size is fixed to a certain value (224x224x3 in our case), but this is not the case for all models. If the input size of our model was dynamic, we would have several Engines created, one for each size.maximum_cached_enginesspecifies how many we can have cached, if your model’s input is static, ignore this value.
Build step
Here is where the magic happens, where the actual crunching is done, at this stage TRT builds the optimized TRTEngines for later inference. Actually this phase is optional, since if it’s not done it will be automatically executed on the first inference.
batch_size = 2

def input_fn():
    # Substitute with your input size
    Inp1 = np.random.normal(size=(batch_size, 224, 224, 3)).astype(np.float32)
    yield (Inp1, )

converter.build(input_fn=input_fn)
converter.save("resnet50_TF-TRT_saved_model")
The build function requires another function that yields the input size of the model, why is this? As we mentioned before, for each possible input size a new TRTEngine is needed, and here’s the funny thing, the batch size is also part of the input size. What this means is that if you build your model with a batch size of 2, and then run inference with a size of 8, when the model receives the first inference call, it will notice that it does not have an engine for this size and will build it, taking a lot of time. tldr; here you must put the same batch size you intend to use on inference, even if that size is 1.
What are the benefitis of running this step in advance prior to inference? Well, as you might have already experienced, the Jetson Nano is not as fast as a V100 machine…, the build step on a fast machine runs almost instantly, but on the Jetson it takes about 30 minutes, if you don’t want to wait half an hour every time you program starts you will benefit from this.
How do we check if the conversion worked?
If you were lucky enough to complete every step without any errors, you might believe that everything went smoothly and you now have a blazing fast model, well, in all honesty we did too, but unfortunately the whole process likes to silently fail.
So how do you check if it actually worked? The following output is what you do NOT want to see:
tensorflow/core/common_runtime/bfc_allocator.cc:246] Allocator (GPU_0_bfc) ran out of memory trying to allocate 4.00GiB with freed_by_count=0. The caller indicates that this is not a failure, but may mean that there could be performance gains if more memory were available.
tensorflow/compiler/tf2tensorrt/utils/trt_logger.cc:43] DefaultLogger Requested amount of GPU memory (4294967296 bytes) could not be allocated. There may not be enough free memory for allocation to succeed.
tensorflow/compiler/tf2tensorrt/utils/trt_logger.cc:43] DefaultLogger /home/jenkins/workspace/TensorRT/helpers/rel-7.1/L1_Nightly_Internal/build/source/rtSafe/resources.h (181) - OutOfMemory Error in GpuMemory: 0
tensorflow/compiler/tf2tensorrt/utils/trt_logger.cc:43] DefaultLogger /home/jenkins/workspace/TensorRT/helpers/rel-7.1/L1_Nightly_Internal/build/source/rtSafe/resources.h (181) - OutOfMemory Error in GpuMemory: 0
tensorflow/compiler/tf2tensorrt/kernels/trt_engine_op.cc:757] TF-TRT Warning: Engine creation for TRTEngineOp_0_0 failed. The native segment will be used instead. Reason: Internal: Failed to build TensorRT engine
tensorflow/compiler/tf2tensorrt/kernels/trt_engine_op.cc:629] TF-TRT Warning: Engine retrieval for input shapes: [[8,224,224,3]] failed. Running native segment for TRTEngineOp_0_0
What happened here is that TRT asked for more memory than was available, it asked for 4GB (because this was the value of max_workspace_size_bytes) and TF’s memory limit was set to 2GB, this lead to no TRTEngine being built, falling back to the unoptimized model. To fix this, max_workspace_bytes must be lower than memory_limit and both smaller than your current available RAM.
Finally, how to run the model?
Finally we are done! we can now run our model on the Nano, below you will find a script for loading the model and benchmarking its fps.
import tensorflow as tf
from tensorflow.python.saved_model import signature_constants
from tensorflow.python.saved_model import tag_constants
from tensorflow.python.framework import convert_to_constants

saved_model_loaded = tf.saved_model.load(
    "resnet50_TF-TRT_saved_model", tags=[tag_constants.SERVING])
graph_func = saved_model_loaded.signatures[
    signature_constants.DEFAULT_SERVING_SIGNATURE_DEF_KEY]
frozen_func = convert_to_constants.convert_variables_to_constants_v2(
    graph_func)

inp = tf.convert_to_tensor(
    next(input_fn())[0]
)

# Benchmarking throughput
N_warmup_run = 50
N_run = 1000
elapsed_time = []

for i in range(N_warmup_run):
    preds = frozen_func(inp)

for i in range(N_run):
    start_time = time.time()
    preds = frozen_func(inp)
    end_time = time.time()
    elapsed_time = np.append(elapsed_time, end_time - start_time)
    if i % 50 == 0:
        print('Step {}: {:4.1f}ms'.format(i, (elapsed_time[-50:].mean()) * 1000))

print('Throughput: {:.0f} images/s'.format(N_run * batch_size / elapsed_time.sum()))
We managed to get 37 frames per second with a Resnet50, which by the way is the same number reported by NVIDIA using pure TRT.
References:
When trying this process we encountered some helpful articles, from which much of the information and figures was gathered:

