AWS Sagemaker Neo with Keras
By Martín Beyer
Quickly validate if SageMaker Neo will lower latency and costs. You have your new shiny model and want to lower latency and costs, let’s get up and running.
In this post we will:
- Save a trained Keras model
- Compile it with SageMaker Neo
- Deploy it to EC2
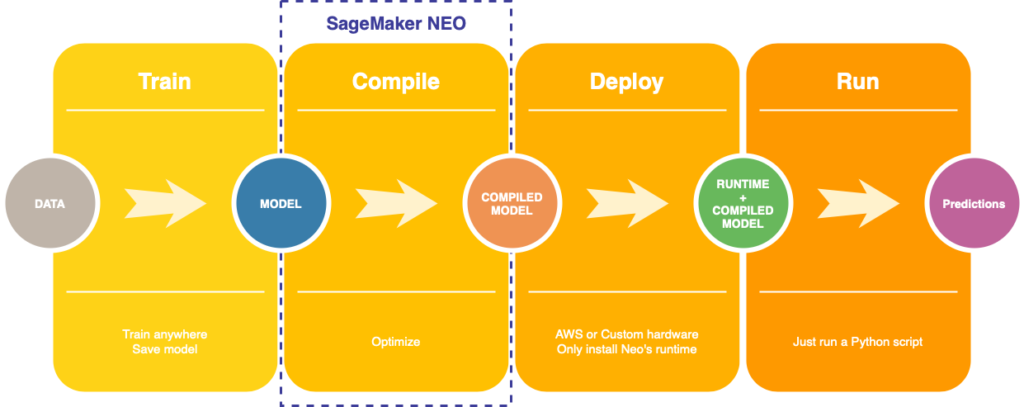
1. Compile model
Where you feed your model to Neo.
We will be using a pretrained InceptionV3 for this tutorial, but you can use any model you want or even your own custom one.
Note that Neo supports every popular DL framework, we will show the process for Keras but it can be applied to Tensorflow, PyTorch with minor changes, these differences are listed at https://docs.aws.amazon.com/sagemaker/latest/dg/neo-troubleshooting.html
from keras.applications.inception_v3 import InceptionV3
from keras.layers import Inputmodel = InceptionV3(weights='imagenet', input_tensor=Input(shape=(224, 224, 3)))
model.save('InceptionV3.h5')
Output:
model.summary()
____________________________________________________________________
Layer (type)                    Output Shape         Param #     Connected to
====================================================================
input_1 (InputLayer)            (None, 224, 224, 3)  0
____________________________________________________________________
conv2d_1 (Conv2D)               (None, 111, 111, 32) 864         input_1[0][0]
____________________________________________________________________
...
Here you should only focus on the last line, the only thing that matters from now on is that you have your model saved as an .h5 file.
Neo expects a compressed .tar.gz file with the .h5 inside, so:
tar -czvf InceptionV3.tar.gz InceptionV3.h5
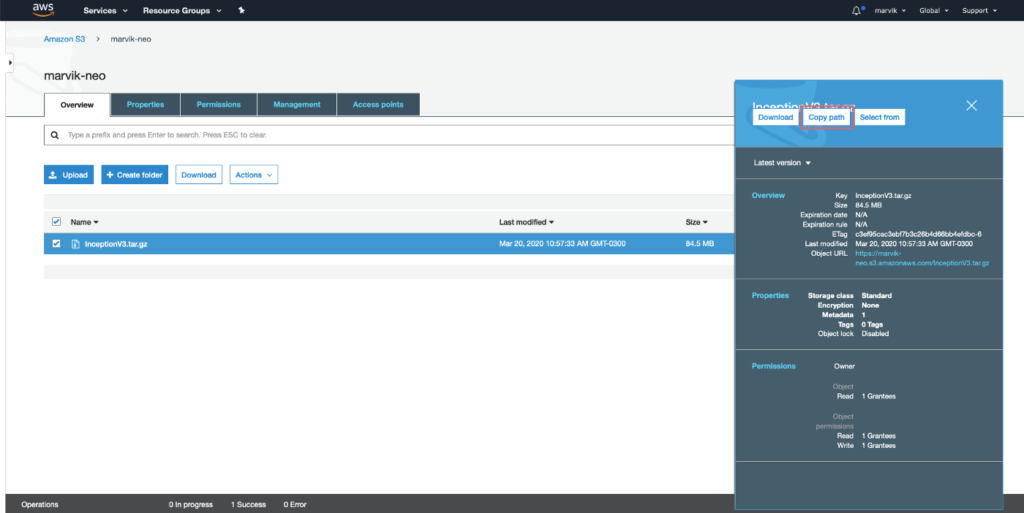
We are almost ready to compile our model, we just need to upload it to an S3 bucket and get it’s path.
If you’re not familiar with AWS S3 don’t worry, its like Google Drive but for devs. There are plenty of resources on how to use it, and it is only needed in this step.
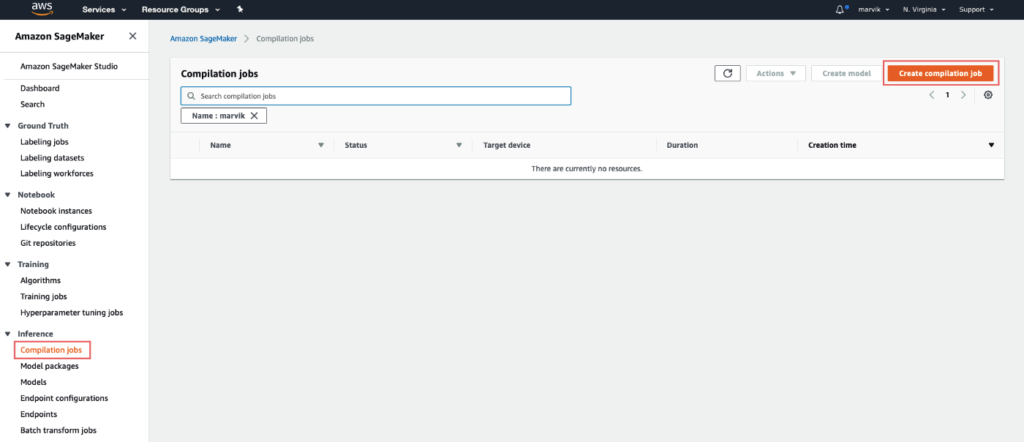
Actually compiling the model
This part can be done in three ways:
- AWS Console
- AWS SDK
- AWS cli
We are taking the first route since the others require some setup. Go to the AWS Console, then to SageMaker and last to Compilation Jobs on the left bar.
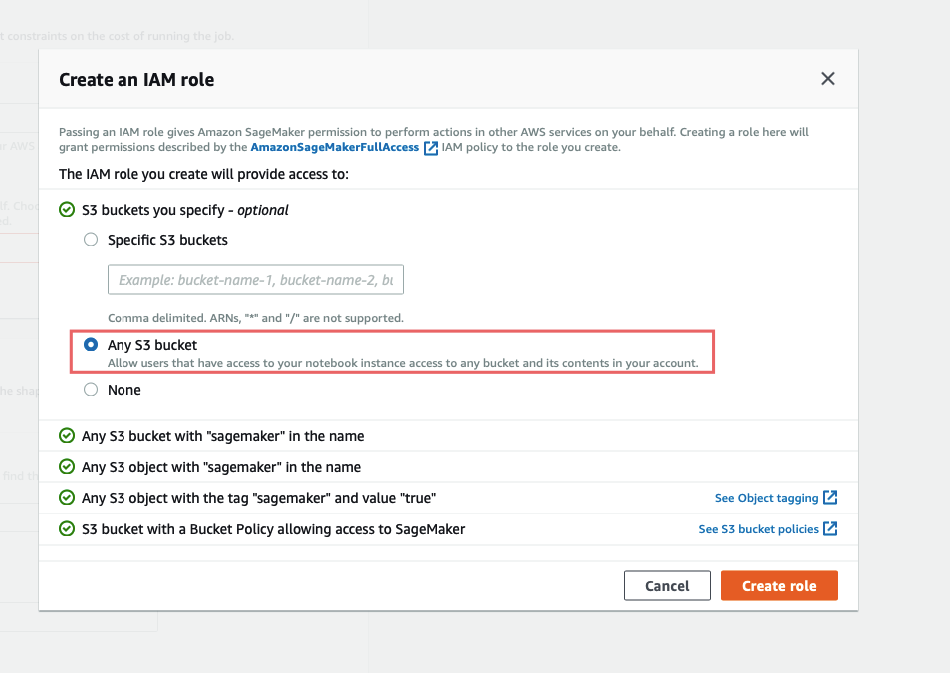
Job settings:
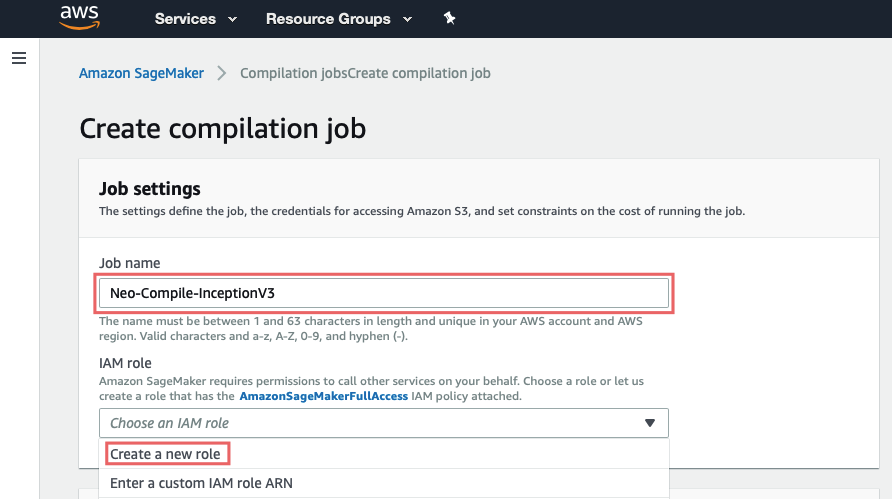
Here you should simply give a name and create a role for the job (this sets up permissions to S3)
For ease choose Any S3 Bucket, and create role.
Input configuration:
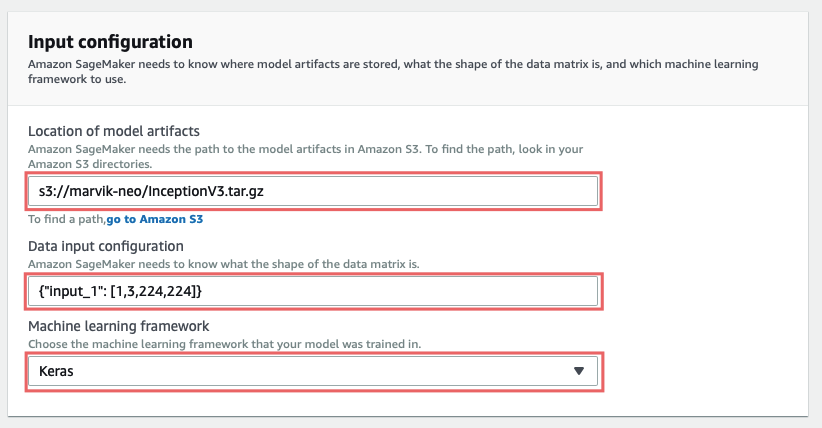
In Location of model artifacts you should input the path to the model you uploaded, it should start with s3://.
Data input configuration expects {"<input_layer_name>": [1, <number_image_channels>, <image_height>, <image_width>]} . You can get this data by doing model.summary() and looking for the first layer info:
____________________________________________________________________
Layer (type)                    Output Shape         Param #     Connected to
====================================================================
input_1 (InputLayer)            (None, 224, 224, 3)  0
____________________________________________________________________
conv2d_1 (Conv2D)               (None, 111, 111, 32) 864         input_1[0][0]
____________________________________________________________________
...
Our model’s input layer is input_1 and by looking at (None, 224, 224, 3) we can get the rest of the numbers we need.
So in our case it would be {"input_1": [1, 3, 224, 224]}, if you look carefully you will notice that the numbers are in different order, this is very important and won’t work otherwise.
If you are curious on why is that: Neo expects Keras model artifacts in NHWC (Number of samples, Height, Width, Number of Channels) but weirdly enough Data input configuration should be specified in NCHW (Number of samples, Number of Channels, Height, Width). For more info on this, including formats for PyTorch, Tensorflow, or if your model has multiple inputs, look at What input data shapes does Neo expect?
Output configuration:
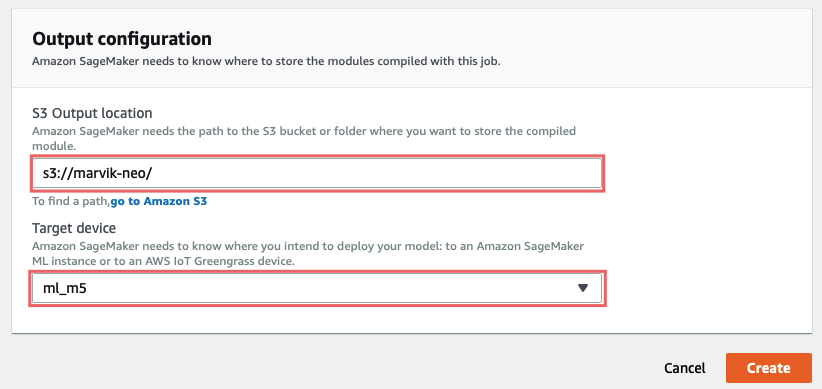
At last, on S3 output location you should type the path to an S3 folder where you want the output artifacts to be saved.
On Target device you have to specify on what platform you are going to deploy this model to, this is crucial for the optimization to work properly. In this guide we are deploying on Cloud, if you are interested on deploying on Edge devices stay tuned for Part 2.
Why is this crucial? At the surface level it needs to know if it will be running on GPU o CPU to optimize the computation graph, if it’s going to run on GPU it may combine multiple layers, likeconv2d+bn+reluto avoid saving unnecessary intermediate results to memory, achieving lower latency and less memory footprint. And at a lower level, it will actually generate platform specific code like CUDA or LLVM IR.
All that is left is to hit Create, and wait for the compilation to be completed.
2. Deploy the model
Up to this point we had:
- Saved our Keras model
- Compiled the model
Let’s have a look at the outputs at each step; at step 1 we get a file containing all the model data, which can be used for inference by loading it with Keras’ model.load() . However at step 2 the artifacts Neo returns are no longer usable with Keras, they can only be ran using a specific neo runtinme.
This means that you only have to install Neo’s runtime on the target device, no need for keras or tf, which by the way saves a ton of space and installation overhead.
This may seem odd at first, but it is needed in order to achieve the lower latency. Why? Well when you save a model from Keras, you are actually saving a graph, this graphs specifies what operations should be done and in what order. An example may be feeding the input through a Dense layer, getting the output and passing it as an input to a Softmax layer.
Then when is time to make an inference, Keras reads the graph and runs the operations specified to give an output.
After Neo compiles the model, the graph now has operations that are not defined in Keras, like the prior example
conv2d+bn+relu, this means Keras would not now what code to run, this is one of the reasons for the need of a specific runtime.In fact in the artifacts of the compiled model there is a file that has optimized code for every operation in the graph, that is then used by the runtime.
So, since we chose as Target device an ml_m5 we are going to launch an ubuntu EC2 m5.large instance and install the necessary dependencies.
sudo apt-get update
pip3 install dlr numpy
Then we have to upload the compiled files to the instance.
Download InceptionV3-ml_m5.tar.gz (from S3 output location), and extract it. To upload it you can use scp on your machine like this:
scp -i "<path to pem file>" compiled.tar ubuntu@<ec2 ip>:~/compiled_model_neo.tar
Then on the instance we do some tidying up:
Note that the artifacts should be all inside a folder, in this case inception.
tar xvf compiled_model_neo.tar
mkdir inception
mv compiled.params inception/compiled.params
mv compiled_model.json inception/compiled_model.json
mv compiled.so inception/compiled.so
Now all that is left to run the model is to create .py a file an run it.
vim dlr-neo.py
import numpy as np
from dlr import DLRModel
# Load the compiled model
model = DLRModel('inception', 'cpu')
print("Input", model.get_input_names())
# Load an image stored as a numpy array
image = np.load('inception/image.npy').astype(np.float32)
input_data = {'input_1': image}
# Predict
out = model.run(input_data)
top1 = np.argmax(out[0])
prob = np.max(out)
print("Class: %s, probability: %f" % (top1, prob))
Final thoughts
Today we compiled and deploy a keras model to an EC2 instance, however you may want to deploy to an edge device, like a NVIDIA Jetson or a Raspberry Pi, this is not only possible, but also really benefits from the optimization since without it it may not even run.

